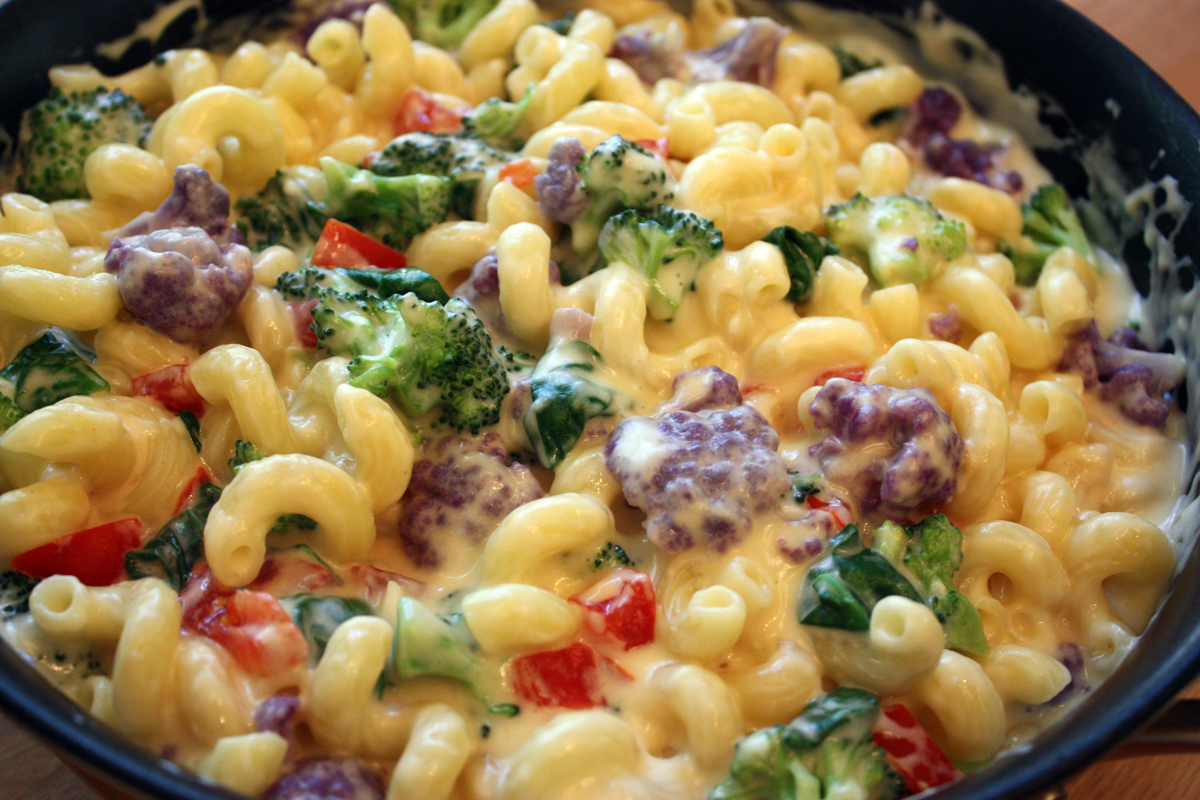
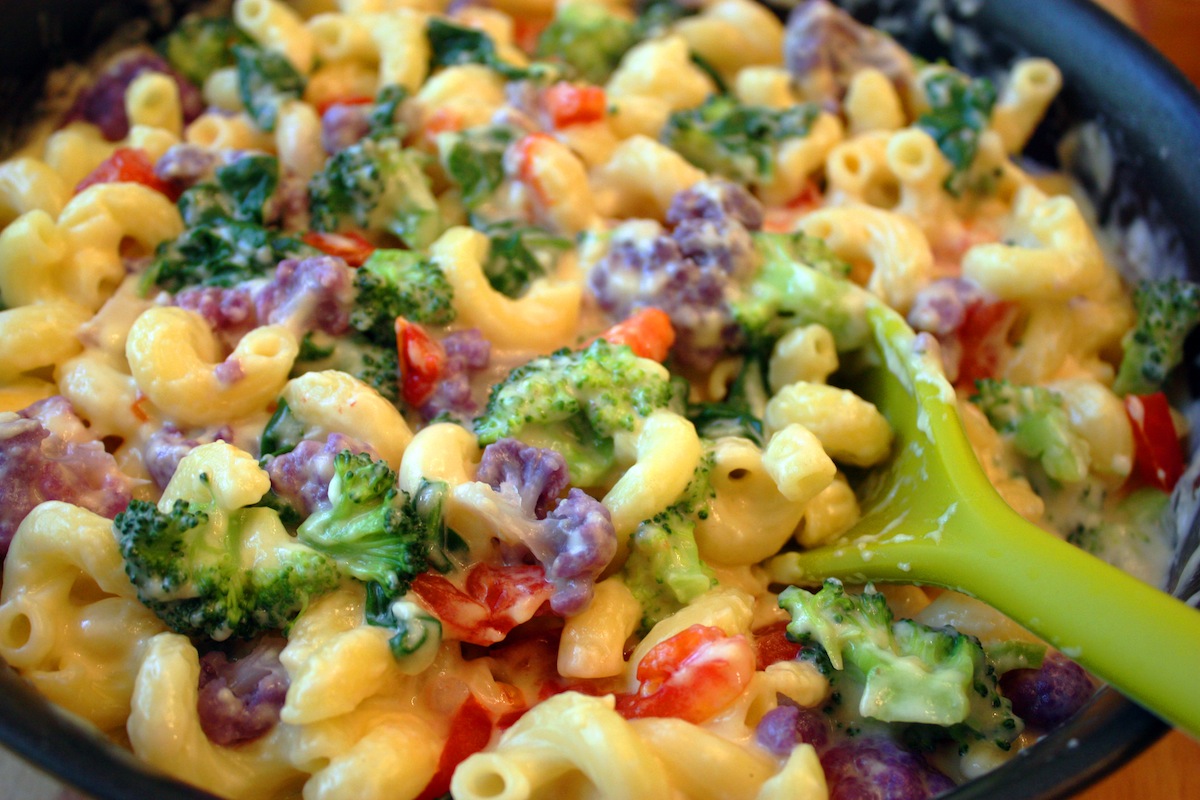
My sister is in town visiting from Canada so I made something quick and easy for dinner. Since we’re both grown up now, I made my grown up mac & cheese. It only takes 30 minutes so we had more time to hang out. You can add different vegetables but I stuck with my original combination of purple cauliflower, broccoli, spinach, and tomato. (here’s the recipe)
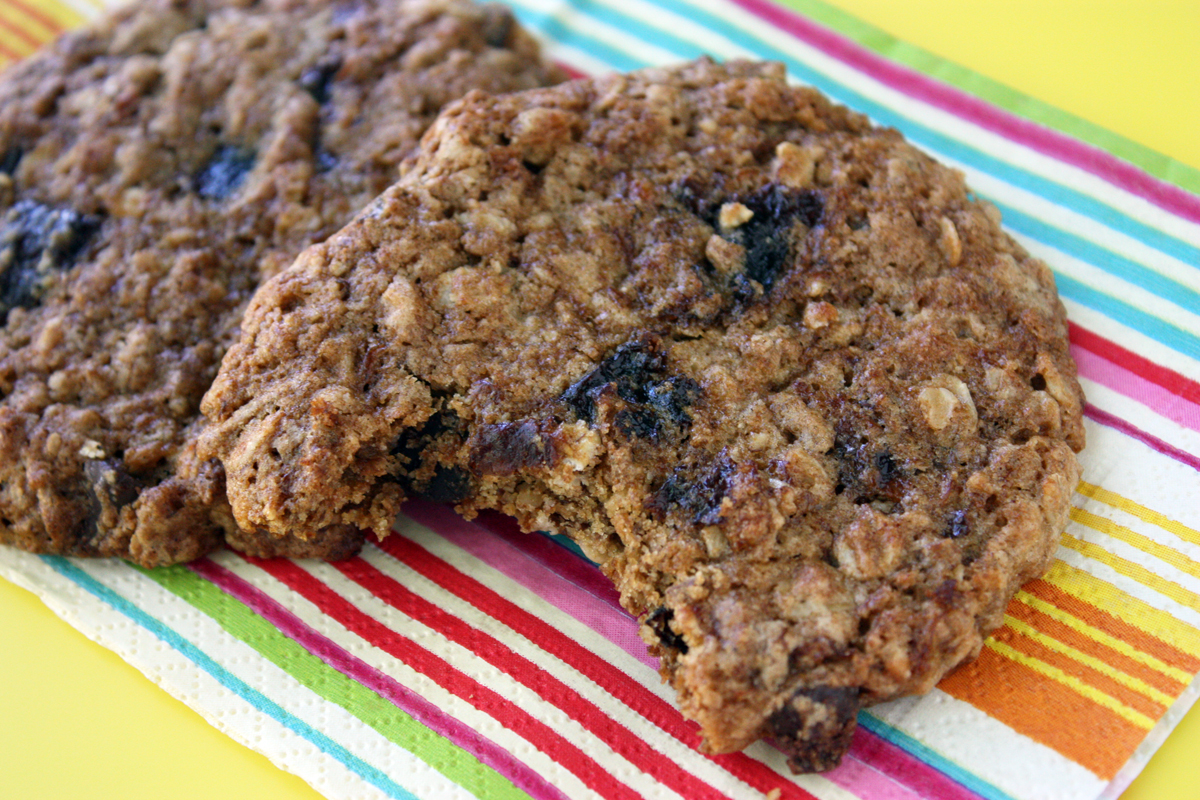
Then yesterday I made my giant breakfast cookies and besides breakfast, they came in handy as a snack during the day. Sis said she’s going to make them when she gets home. It’s probably the recipe I make the most because I know how important it is to eat fiber and these have 4 grams of fiber each! (here’s the recipe)
So that’s what I cooked today. …just sharing… – Jenny Jones
I LOVE this dish. I’ll say it again. I LOVE this dish!!! It’s easy to make and has three vegetables (broccoli, cauliflower,and tomato) and everything is coated in a light creamy, cheesy sauce. It’s mac & cheese for grownups but don’t you think kids would like this too? If they’re picky, use white cauliflower and they’ll never even see it. It’s soft and blends right in with the pasta. If you make it, let me know if it passes the kid test.
It’s important to do all your prep first because everything cooks quickly. It won’t take long if you buy the already-cut vegetables but I cut all of the veggies myself. The prep includes cutting the vegetables, shredding the cheese or slicing it really thin. Hey, you’ll be cutting the cheese!
Speaking of cheese, please don’t buy pre-shredded cheese. It has an additive and will never melt as well as a block of cheese. I’ve made it with reduced fat cheese and whole milk cheese.
This recipe is similar to my Quick & Easy Mac & Cheese but with less pasta and added vegetables but it’s still a quick and easy dinner. I wasn’t sure what to call it… veggie mac & cheese or mac & cheese with vegetables or maybe rainbow mac & cheese. I decided on “Grown Up” because we grownups know how important it is to eat vegetables at every meal. And if they’re buried in my delicious mac & cheese, it’s a win-win. Click here for the recipe. – Jenny Jones
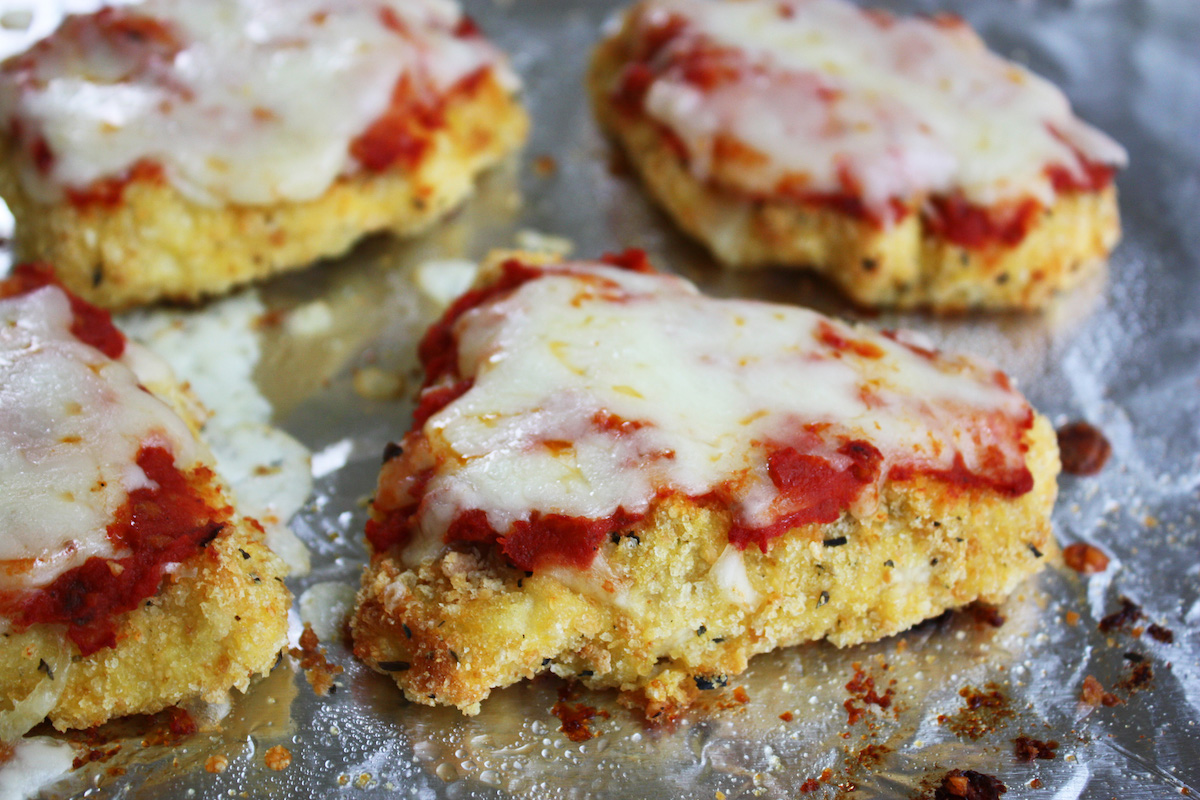
There’s almost no cleanup with my easy chicken parmesan recipe. The prep is all done on wax paper and if you line your baking sheet with foil like I do, you won’t have to wash it. This recipe will convince you that frying is not necessary to make a fabulous chicken parmesan. First I pound the chicken to an even thickness of 1/2-inch. That’s to make sure it cooks evenly. Then I dip each piece in flour, beaten egg, and finally coat it with (homemade) bread crumbs that I season myself.
I start with plain breadcrumbs and season them with a store-bought Italian seasoning mix. Then I add parmesan cheese and it makes an delicious breading for these chicken cutlets. They bake for 20 minutes… oh hey… that’s just how long it takes to make my quick and easy marinara sauce, start-to-finish. After 20 minutes, top it with some sauce and shredded mozzarella cheese, bake a few more minutes and… yummm! I always shred my own cheese because packaged pre-shredded cheese does not melt as well.
The last time I made this I baked it at 425 for 17 minutes and it was a bit more crispy but it’s not much of a difference. This photo above was baked at 425. Let me know if you try the higher temperature.
Who doesn’t like chicken parmesan? Now you can make a healthier chicken parm topped with part skim mozarella to keep it low fat and light. This is truly Italian comfort food. Click here for the recipe. – Jenny Jones
With visitors from all over the world (over 170 countries) there was some confusion about the spices in my marinade so I have added a simpler combination of orange & lemon juice, garlic and salt. I made another change too by reducing the cooking time and increasing the oven temperature.
Like most cooks, my recipes evolve over time because I’m always trying to make things better. That’s why I created a special category in my blog called “Recipe Changes/Fixes” so if anyone is confused, thinking something is different than they remember, they can check on any changes I made in that blog posting.
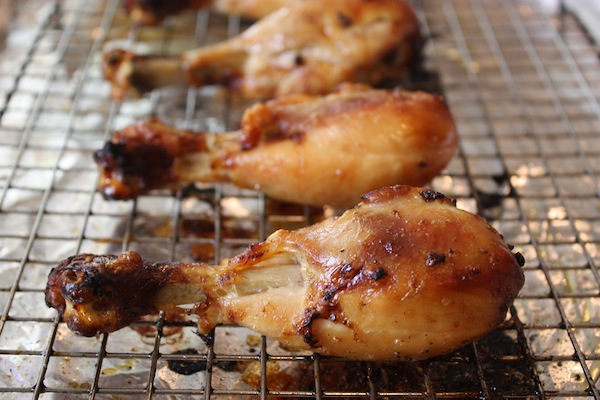
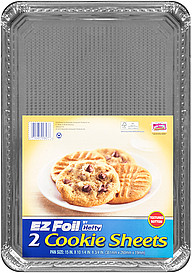
I’m still working on avoiding the messy job of cleaning the rack. I tried roasting the drumsticks on greased foil but they stick to the foil even when it’s greased. I did find one thing, however, that is a disposable foil pan that allowed me to eliminate the rack.
It’s called EZ Foil by Hefty and these cookie sheets are textured on the bottom and there was no sticking whatsoever, and no greasing necessary. The drumsticks turned over beautifully with no effort at all. I’m guessing not all stores will carry these sheets but wow, I love the textured feature. And oh… good news: I wash and re-use them.
I almost always make these skinless chicken drumsticks on Fridays because they make great weekend snacks, even served cold. Click herefor the recipe. – Jenny Jones
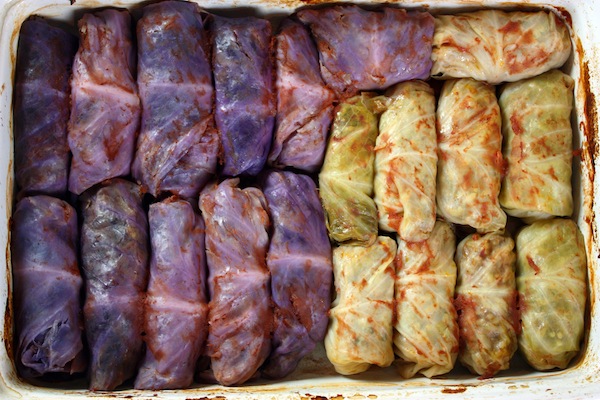
I always wondered if cabbage rolls made with red cabbage would turn out and now I can report on my experiment. I already knew from eating lots of cabbage salads that red cabbage is a little tougher than the green one. That turned out to be true even when the leaves are softened for cabbage rolls. I boiled the whole head of red cabbage for ten minutes, just like I do the green one for my cabbage rolls. The leaves didn’t seem soft enough so I put them back in for another few minutes and they seemed a little softer. I then proceeded as usual, cutting off the thick spine to make them easy to roll.
The main difference occured when rolling. I made both green and red ones so I could really compare and the green leaves rolled up beautifully and didn’t tear or break. But some of the red ones tended to break and crack so I had to patch the crack and then roll up my golabki. So the red leaves were a little harder to work with but I must say they do look good.
And the taste? Wonderful, just like the green ones. So my summary is… if you are making cabbage rolls for the first time, stick with the green cabbage. The soft leaves will be easier to roll and you will be confident in making them again. If you make them in red, just be prepared for a little extra work if they tear but that can happen with green leaves too. When it happens, you remove the filling, lay an extra piece of a cabbage leaf over the tear, fully covering and overlapping the tear, then add your filling and roll it up.
Cabbage rolls made with red cabbage make a beautiful presentation and once they are cooked, the red rolls are just as tender as the green ones. So there is my report. I will definitely make red cabbage rolls again if only for the reaction I’m sure to get when I put them on the table.
My Polish cabbage rolls recipe has been very popular and I’m thrilled with the number of people who have made and love them. Over 1/4 million people (update February 2021 – over 15 million!) If you haven’t made stuffed cabbage yet, click here for the recipe. – Jenny Jones
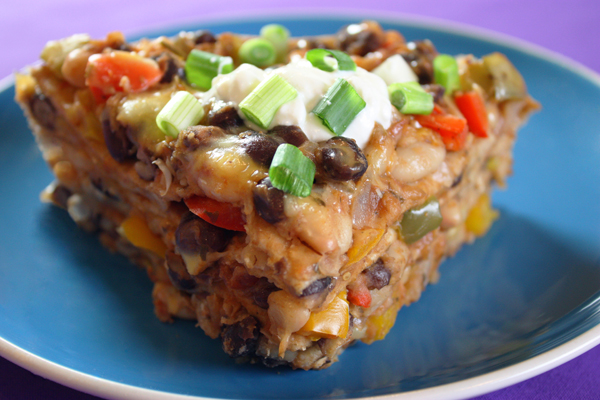
You only need a few basic ingredients to make this easy tortilla pie: whole wheat tortillas, canned beans, bottled salsa, peppers, and reduced fat cheese. Add some onions and garlic and this comes together pronto in a yummy, stick-to-the-ribs dinner the whole family will love.
Here’s why I love my easy tortilla pie: It has two different kinds of beans, black and cannellini beans; It has three different colors of pepper – red, green and yellow; And it’s made with whole wheat tortillas. Even if you aren’t a fan of whole wheat tortillas, they become so soft when baked with my sauce and cheeses, you can eat this moist layered casserole with a spoon.
There’s a recipe for tortilla pie in my original cookbook but this new recipe is simpler, faster, and healthier, not to mention even more delicious. This is an easy recipe to customize and make your own. If you like is spicy, be sure to include the jalapeño pepper and get a jar of spicy salsa. If you like it mild, you can leave out the jalapeño pepper altogether and replace it with extra bell pepper, or a milder Anaheim pepper, and use a mild salsa.
Here are a couple of brands I use in this recipe:
Tortillas – Trader Joe’s Whole Wheat Tortillas
Salsa – Green Mountain Gringo from Whole Foods
I make my pie in an 8-inch round pyrex baking dish with tall sides and a glass lid. Sometimes I cut the tortillas to fit exactly into the baking pan and with this pan, the filling all stays inside and doesn’t spill out. A lot of recipes use a springform pan and if you have one, that’s the pan to use. You can also make this tortilla pie in any kind of pie pan, preferably deep dish. Some of the beans may spill out but who cares? Just make sure you cover it well with foil.
Nutritionally, this healthy meal is hard to beat. There is lots of fiber in the beans as well as the tortillas, and beans also provide calcium and protein. The colored peppers are full of antioxidants to help protect against diseases like heart disease and cancer. And if you make it spicy, spicy foods boost metabolism and that helps with weight loss. But the best reason of all to make this easy casserole is it’s simply delicious. And it’s meatless, too. Click here for the recipe. – Jenny Jones
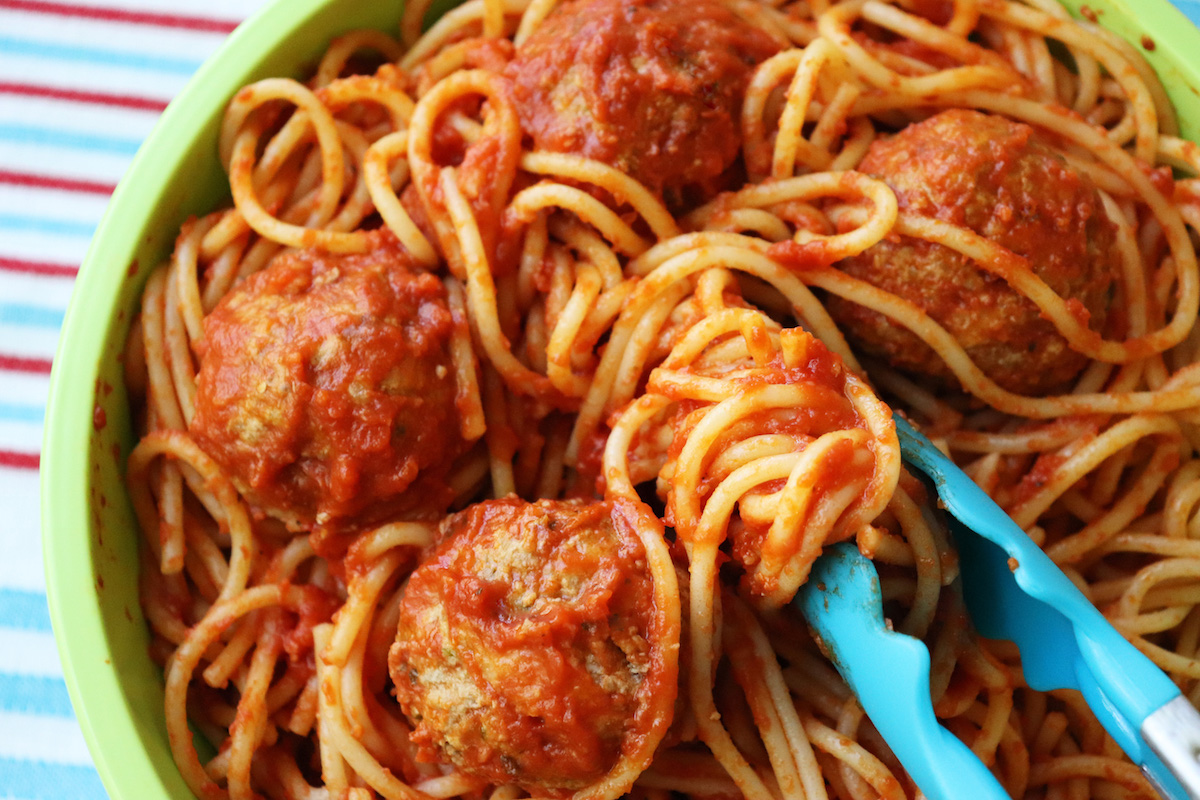
Looking for a family dinner that pleases everybody? Make my quick & easy spaghetti & meatballs! It only takes 35 minutes to make this delicious family favorite, all from scratch, and I promise you will never have leftovers. The lean meatballs are made with ground sirloin and they are super soft because they cook right in the sauce. The sauce is my quick & easy spaghetti sauce and I just add the meatballs (& spaghetti) to make this a complete meal… but don’t forget the salad.
This is really a quick & easy recipe because the sauce takes 5 minutes of prep and the meatballs take 10 minutes to put together. Then it all cooks in one pot and you have the most delicious spaghetti dinner. The sauce needs to cover the meatballs and the pot I use measures 7 1/2 inches across. If your pot is bigger than that, you might need to make more, smaller meatballs so they are covered by the sauce. Marinara sauce does not need to cook for hours on the stove. My recipe uses canned plum tomatoes, the best kind for sauce, and I prefer a smooth sauce so I puree the whole tomatoes first. If you like it more chunky, you can cut the tomatoes up with scissors or a knife for a chunkier sauce.
These meatballs and so soft they really just melt in your mouth. That’s because I use fresh bread crumbs and not dried ones. To make fresh crumbs, which are just soft bread in tiny pieces, I process two slices of bread in a food processor. Then I just wipe out the bowl and use the same one to puree the tomatoes. If you don’t have a food processor, you can cut the bread into small pieces and puree the tomatoes in a blender.
Whether you’re having company or a family dinner, you can’t go wrong with homemade spaghetti & meatballs. Try my easy recipe and you’ll see why they call it comfort food. Click here for the recipe. – Jenny Jones
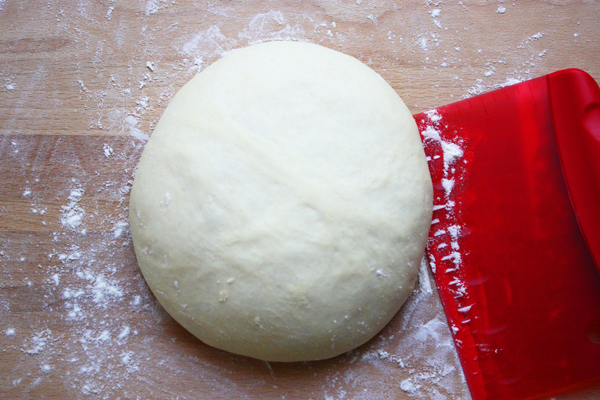
Good news! After the success of my faster no knead bread I wondered if the same concept would work for my pan pizza. It does. The original easy pan pizza recipe, which is the most viewed video on my youtube channel, is a really easy recipe but you have to start the dough the night before and let it stand overnight. The result is an amazing crust that everyone has raved about but now, you don’t have to start it the night before. All you do is use hot tap water instead of cold water (the original recipe calls for cold water) and you can start the pan pizza the day you want it. I’m so excited about this.
Simply by switching from cold water to hot tap water (not boiling), you reduce the overnight rest of 12 hours to only 3 hours. Here’s what to do: Use the same exact recipe but use hot water instead of cold, and instead of letting it rest overnight on the counter, you let it rest for 3 hours on the counter. After 3 hours, you proceed with the original recipe from step #2. There it is. My faster easy pan pizza.
The main thing to remember is that instead of starting it the night before, you can start this easier faster pan pizza about 5 hours before you want to eat. Click here for my original recipe. – Jenny Jones
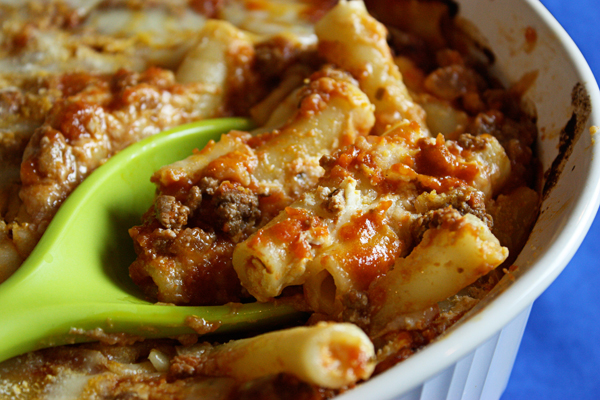
If you like lasagna you will love this easy casserole. Baked ziti is a classic Italian dish and my version is light and healthy, made with lean ground sirloin and part skim cheeses. If you’re tempted to buy pre-shredded mozarella for this dish you may be disappointed. Any cheese that is pre-shredded will never melt as well as real cheese that you shred by hand. That’s due to the stabilizers that are added to packaged shredded cheeses. It takes about a minute to shred your own cheese so just do it. You’ll be rewarded with a creamy, melty dish that’s as close to lasagna as I’ve ever had.
Homemade marinara sauce is great if you choose but for this dish, bottled sauce works really well. Ziti is not always available so you can use other shapes of pasta with penne being the closest. The man in my life recently had a birthday and I offered to make him anything he wanted for dinner and for his birthday cake. He could have had anything that I make and guess what he wanted? He asked for baked ziti for dinner and my fresh strawberry cake for dessert. Good call, since I was eating here too. To try my Easy Baked Ziti click here for the recipe. – Jenny Jones
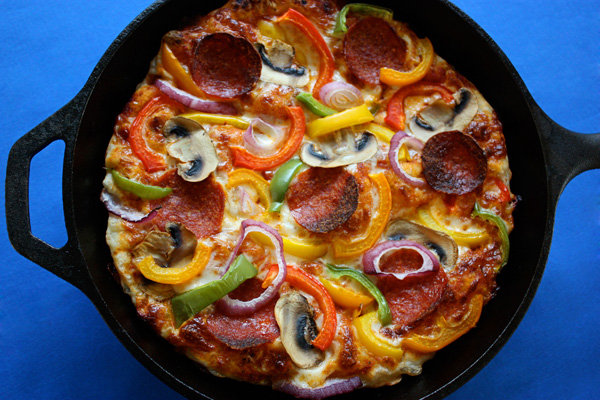
What do we want? Pizza! When do we want it? Now! Homemade pizza is easier (and faster) than you think. It used to take hours to knead and rise the dough but not any more. My quick & easy pizza dough is made from scratch and is ready to use in less than 20 minutes. I takes longer to heat up the oven but that’s okay because the dough can continue to rest until the oven heats up… or the grill. Yes! I have made pizza on the grill, on a pizza stone on the grill, in the oven on a stone, in the oven on a pan with holes, and even in a cast iron skillet on the stove. You can see that a pizza lover like myself needed to find a way to make pizza dough as quick and easy as possible. And I have.
This recipe is flexible too. You can use either bread flour or all-purpose flour. The difference is subtle but I find the crust a little crispier with the bread flour. And… you can use either instant yeast or regular active yeast, the only difference being the temperature of the water. If you read the package of yeast you’ll see that instant yeast calls for hotter water (120° F) while active dry yeast requires water at 110° F. Did I say flexible? There’s even more. Once you put this dough together, you can also choose to let it rest for an hour or more. It will puff up and double in size. Or… (wait for it)… you can refrigerate it for pizza the next day, or the next 2 or 3 days. Refrigerating pizza dough does result in a better crust but I don’t always plan my dinners ahead. Here’s my typical pizza-making schedule:
An hour before dinner, I preheat the oven. Then I put the dough together and let it rest. While I wait for the oven I prepare my toppings and make a salad. I shred my own cheese because the pre-shredded kind does not melt the same. I slice toppings and try to remove some of their moisture for a crispy pizza. Once the salad is made, I roll the dough, put on the toppings, and put the pizza in the oven, which has had time to heat up by now. (don’t put pizza in until the oven is hot enough) While the pizza cooks, we have our salad. As soon as we finish the salad, the pizza is done, hot, crispy, and ready to eat.
I seriously don’t know anyone who doesn’t like pizza. And once you start making quick and easy pizza at home you will never want to get delivery again. It simply will never compare. Besides, you can make your own pizza healthier, with reduced fat cheese, healthy toppings, and a crust the way you like it. Thin crust? Just roll it thinner and make two. I hope this easy recipe motivates more people to make healthier and faster pizza at home.
UPDATE (June 17, 2020) Since posting this recipe I find myself more often refrigerating the dough overnight. The flavor does get better with time and the edges of the crust seem to puff up more when it cooks. My favorite method these days is using a wooden paddle and pizza stone. But no matter what, any kind of homemade pizza is the best! ?