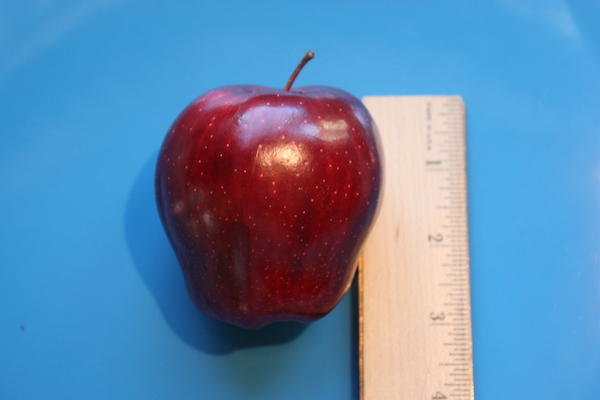
So here’s what happened. In my endless and wasted hours of research on making sourdough starter (yes, I’m still mad! 😖) I saw one comment saying that the starter might not work as well with organic whole wheat flour. So I bought a bag of regular whole wheat flour and it started going well for a few days and then failed, just like all my other sourdough fiascos. (…still mad…) But that comment made me wonder… would plain whole wheat flour work better in my no knead bread? I think it did.
My whole wheat Dutch oven bread was always delicious but never as tall and airy as the plain white bread flour version. I already had the non-organic whole wheat flour so I decided to try it. Look at the result! ⤴ It was almost double the height of my usual loaves. And look at that crackly, crispy, crust! Maybe it’s a flook, I thought… a mere coincidence. I finished the loaf and made another one with the non-organic flour. Same thing. Beautifully big and lofty. And shouldn’t your bread reflect your goals in life? Big and lofty? 👍
It’s my belief that non-organic whole wheat flour makes a better loaf of no knead bread and that’s why I’m sharing it here. I use a lot of organic products when possible, but if the lettuce is wilted and sad and looks like it’s trying to talk, saying “I know. I wouldn’t buy me either,” then I buy non-organic. It’s the same with this bread. I wouldn’t buy my old whole wheat bread at the bakery, so I am switching to non-organic flour. If my old loaf could talk, it would say, “I’ll miss you, Jenny, but I’m not here to judge. I know in my heart that relationships don’t always last. I wish you and that non-organic whole wheat whore the best.” 😲
For anyone using corn starch in their recipes, I want to share the new way that I measure corn starch… using an empty baking powder tin! I just fill the empty tin with corn starch and measure away. It’s as simple as that. You can also use these tins to measure cocoa powder or spice mixes you make at home. Well, that’s all for today. I’m off to buy popping corn for my Christmas caramel corn. 🍿😋🍿
Is anyone else tired of cleaning your garlic press? Or of chopping garlic? I know I am. I cook with garlic all the time and I saw a great tip on a better way to use garlic. All you do is add a whole peeled garlic clove directly into your pan while cooking. You’ll still get plenty of garlic flavor without the mess. Once your recipe is done, simply remove and discard the garlic. I forgot once and ate the whole thing but that’s okay – you’ll gets lots of health benefits, just maybe not a lot of close-up friends!
Many recipes start with sautéing onions and garlic and so you sauté them together. I actually put my olive oil and garlic clove in my pan and start to heat it up. Once the garlic starts to sizzle, I add the onions and away I go. Another benefit of this method is that your garlic won’t burn so easily. Actually, mine has never burned this way, probably because it’s whole and not chopped fine or crushed. I’ve been using garlic this way for months with chili, one-pan pasta dishes, rice, and spaghetti sauce, and thought I would share this will my follow cooks.
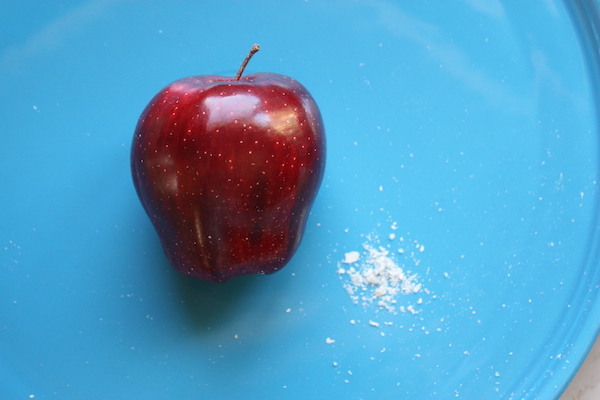
If this looks like the perfect apple, it might be too good to be true. Apples in their natural state are not glossy. So if you see an apple like this red delicious, don’t take a bite just yet. It might be like snacking on a candle because some apples are coated with wax to keep them fresh longer. It’s called “food-grade wax” but I’m not buying it. That’s like saying, “food-grade dirt.” It won’t kill you but do you want to swallow a spoonful of dirt? How about a spoonful of wax in your stomach?
I love red delicious apples and bought a few last week. When I ate the first one, I had a hard time chewing the skin. I couldn’t remember red delicious skin being so hard to eat. Then I remembered reading about wax on apples and I was sure this apple was coated so I decided to try removing it. I scraped it with a small paring knife and was shocked to see how much wax came off this small 3-inch apple.
Imagine how much is on a big apple! So when you see a glossy, shiny apple, it just takes a second to scrape it once with a knife to test for wax. No wax? Enjoy the apple and the skin, which has more nutrients than the inside. If you see wax, you can scrape it off with a knife or you can drop the apple into boiling water for 5 seconds to melt the wax, then rub it off with a coarse towel. Keep the wax away and eat an apple a day. 🍎
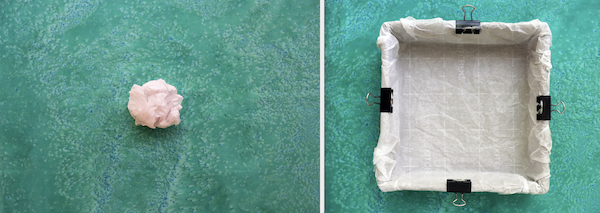
A few people shared this concept of lining a square pan with parchment paper by crumpling up the paper into a ball and then pressing it into the pan. I was a little skeptical but decided to try it and and it really works. I always struggled with lining my square pan for granola bars, which I make almost weekly, because you pressed one side down and the other one pulled away. This way is much easier. I don’t know why… it just works. – Jenny Jones
FOR A COMPLETE LIST OF ALL MY HOW-TO TIPSClick here.
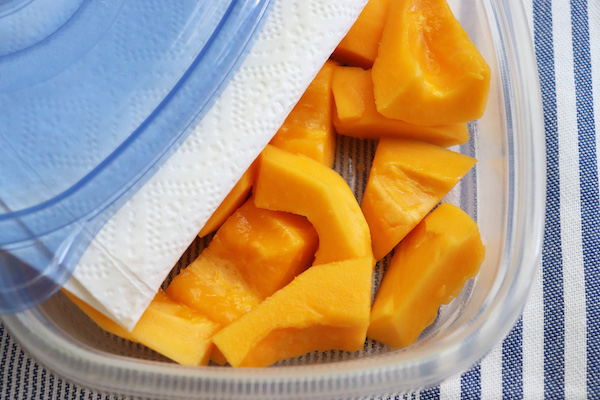
Most of us are not grocery shopping as often as we used to and that includes me. I go once a week during the “geezer hour” when they open early for us seniors. So I had to figure out the best way to store my cut fruit and veggies so they would last all week. I always have some crudité on hand as well as cut papaya or melon. I store them in those Glad plastic containers and I noticed that moisture always accumulated inside but on the underside of the lid and moisture is not a friend to cut fruit or vegetables.
I tried lining the container with a paper towel but the moisture still did its damage. Then I tried putting a piece of paper towel or a napkin on top of the fruit to keep the moisture from dripping down on the fruit. Guess what? It works! The paper on top of the cut fruit keeps the excess moisture away and now my cut papaya keeps all week and my crudité of carrot & cucumber slices and cabbage wedges stays fresh twice as long as before. I just wanted to share this tip for everyone else who is eating lots of fruits and veggies. You ARE eating lots of fresh fruit and vegetables, right? What was that? “I try…???” Don’t get me started! ?
Fresh fruit and vegetables are the lifeline to good health. ???? So here’s a new rule: You can’t make any of my breads until you’ve had some fruit and veggies. Don’t make me come over there! ?
FOR A COMPLETE LIST OF ALL MY HOW-TO TIPSClick here.
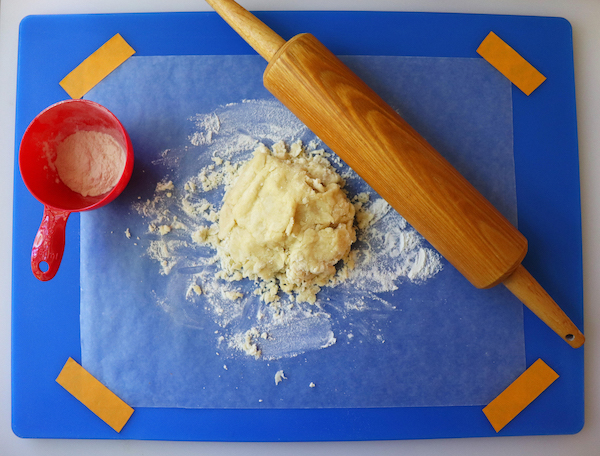
My thanks to Annie Y. for sharing this terrific helpful hint. I tried it myself and loved it, especially with my no knead crusty rolls that make a sticky mess on the counter. She said, “I don’t have a large wood board, so I taped a piece of waxed paper to the counter top and floured it, allowing me to work and form the dough easily and making clean up a breeze.” Thank you, Annie.
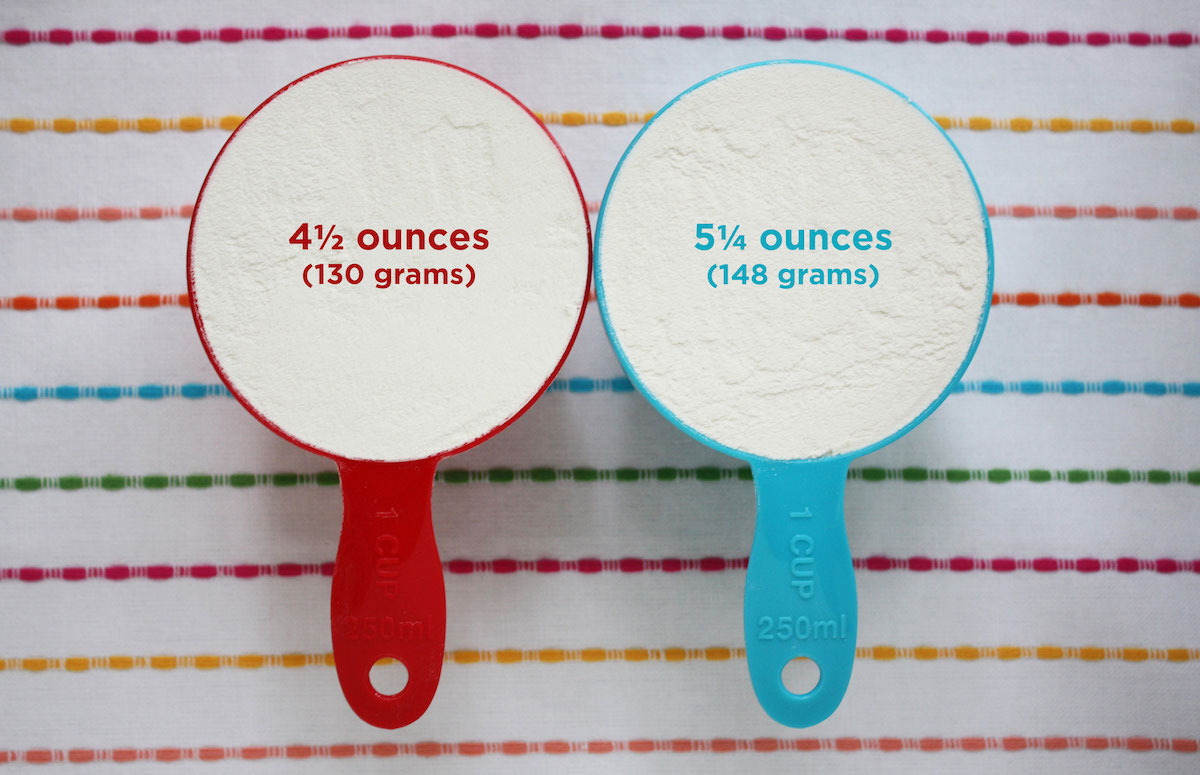
Bread dough too dry? Cookie dough too heavy? You probably didn’t aerate your flour.
The two cups in this photo are exactly the same size. The left (red) one contains flour that I aerated, scooped into the cup, and leveled off with the back of a knife. The right (blue) one I did NOT aerate, just scooped it into the cup, and leveled it off with the back of a knife. Then I weighed the flour from both cups.
You can see that the flour that was aerated (red) weighs less than the NOT aerated flour (blue) and that’s because flour settles in the bag or container and if you measure it without aerating, you will probably be using too much flour. This can cause baking problems, especially if you consider that 3 cups of flour, that should weigh 13 1/2 ounces might weigh 15 3/4 ounces if not aerated before measuring. That’s exactly 1/2 cup more flour than you need!
Oh… one more thing. Aerating is not sifting. To aerate flour, you simply stir it around in the container with a spoon or spatula to incorporate some air. You can see how I aerate flour in my Quick and Easy Chocolate Cake video at the one minute mark: Click here to see it. I hope this is helpful and you have great results with all your baking. ? – Jenny Jones
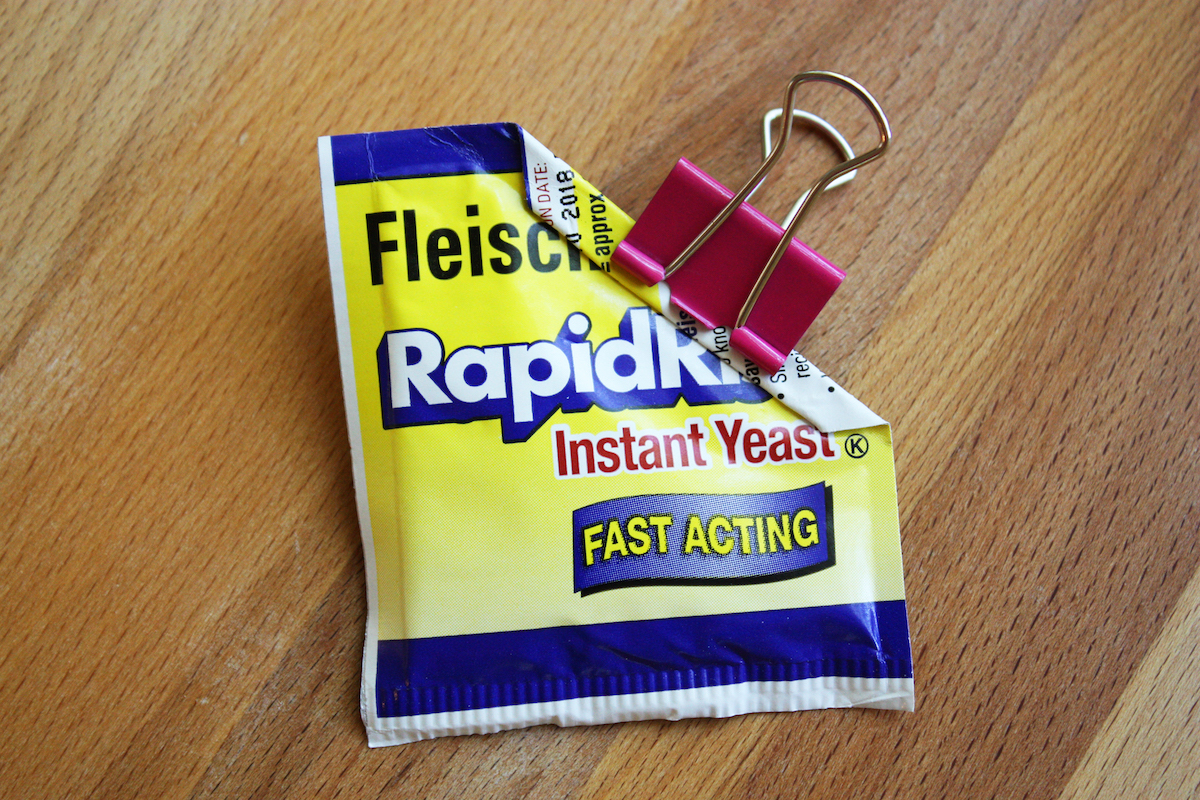
Yeast has a short shelf life and once any package of yeast has been opened, it should be kept in the freezer. I always use the small packets and I find that using a butterfly clip, the kind you can get at an office supply store, is a good way to seal up the packet for freezing. A paper clip would also work. I snip off the corner of the packet, measure what I need, fold the open corner over twice and seal it with the clip. Then I pop it in the freezer. – Jenny Jones
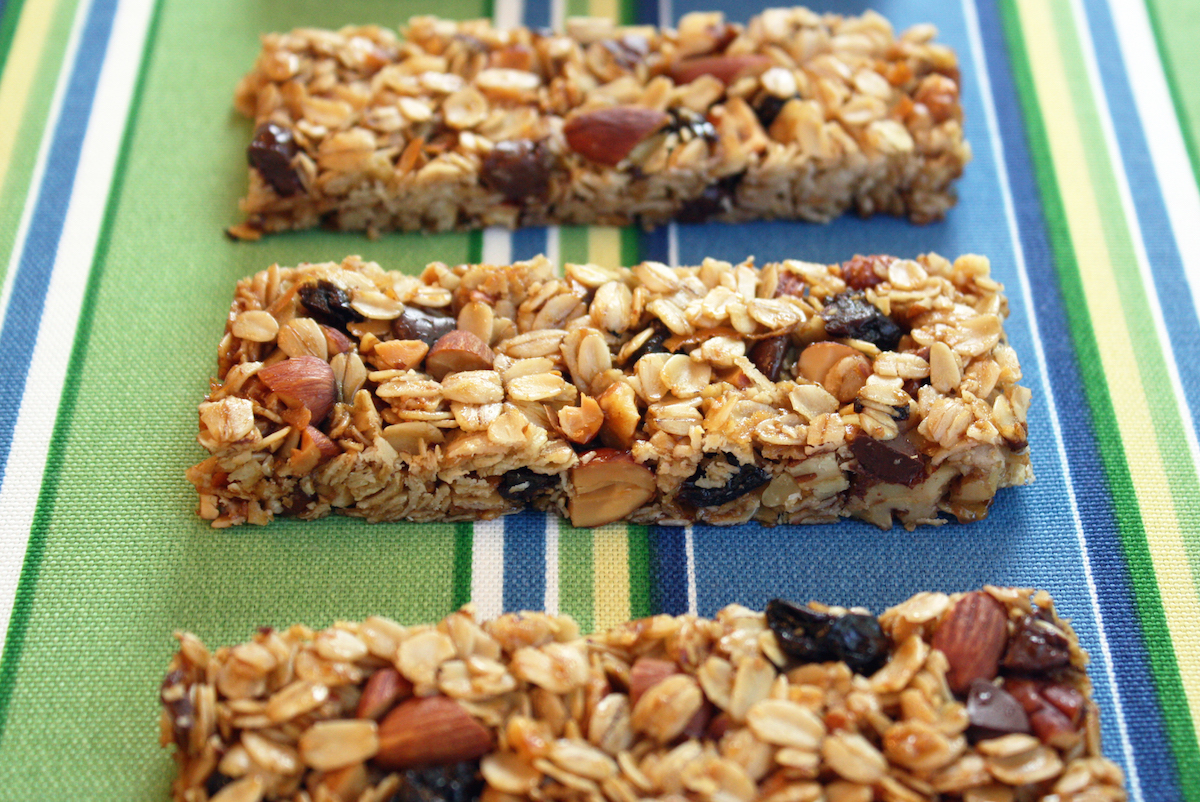
If you’ve ever wondered which one of my recipes I make the most, it’s granola bars. I make them almost every week. Granola bars were never my favorite thing to eat but I would occasionally buy one when I was away from home and getting hungry because it’s a healthy choice but the ones from the store never left me wanting more. These days I crave granola bars because homemade bars are infinitely better… and easy to make.
I make sure we always have these delicious bars at home and as soon as we run out, I make more. They are full of protein and fiber and they are incredibly easy to make. Everything mixes in one bowl and you bake it.
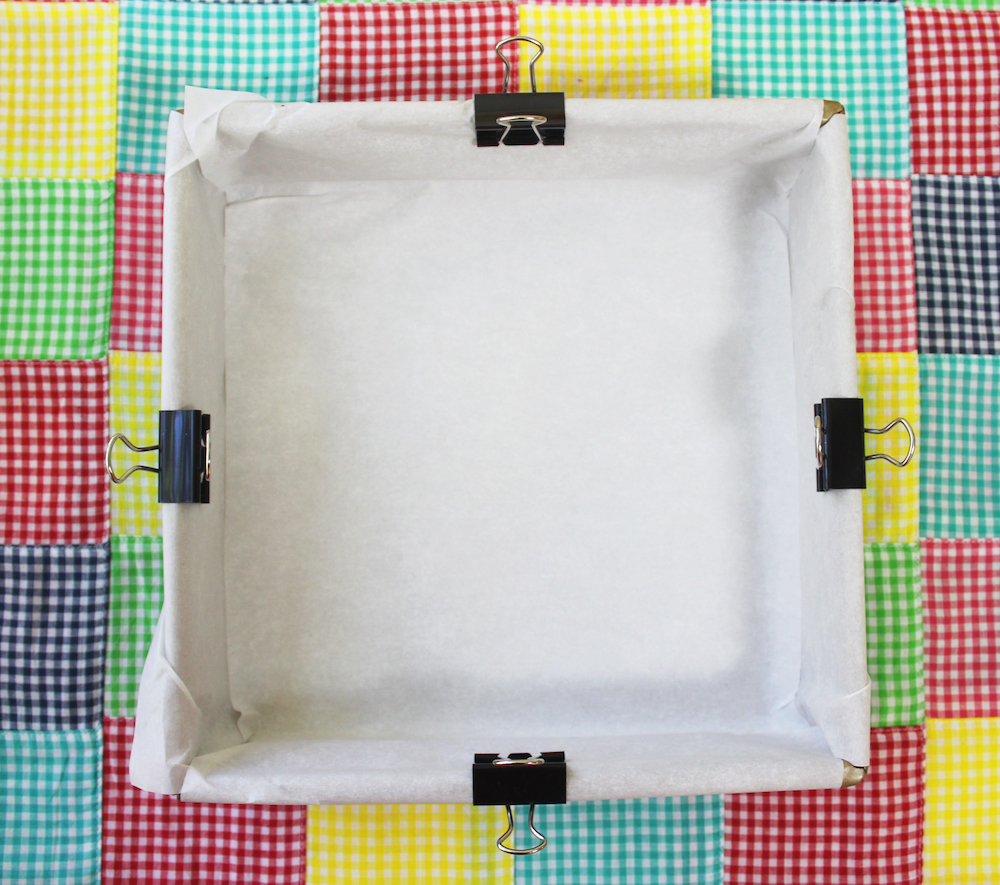
How To Line a Pan for Granola Bars (with Parchment Paper).
The hardest part is lining the pan with parchment paper because it won’t always stay in place, but I found an easier way to do it… with binder clips. You can get them at a stationery store and since they’re metal, they can go right in the oven.
Cut two parchment paper pieces a little bit wider than your 9-inch pan and lay them in, criss-crossing each other, clipping the ends down as you go. It will keep the paper in place, like this…
Now that you know how easy it is to make your own granola bars, try them and see if you don’t wind up like me, making them every week. Every time I go out the door, I take one with me. You will too. Click here for the recipe. – Jenny Jones