BEFORE ASKING A QUESTION… please see the links below on the most commonly asked questions. I am not always able to keep up with questions so please also look through the recipe comments from other cooks, or maybe you can research your question online.
Click the “Your Photos” link at the top and use the link provided or just click on this link: YourPhotos@JennyCanCook.com An email window will open and you can attach or drag your photo into the email and send it.
Questions about your no knead bread or rolls? These notes should help…
My dough didn’t rise.
No knead dough doesn’t rise like standard yeast breads, it only puffs up and gets bubbly. It will be a little bigger after the resting time but don’t look for a much larger volume.
Your yeast may not be fresh and should not be used past the expiration date. Even with a good expiration date, yeast has a short shelf life once a package is opened. Even with the small packets, once it’s opened, yeast should be tightly sealed and kept in the freezer, not refrigerated.
Your water may have been the wrong temperature. For the faster method, a temperature between 120°F to 130°F. is best. Anything hotter than that is too hot. And boiling water is definitely out. For the overnight method, cold to room temperature water works.
You changed the recipe. It’s best to follow the recipe exactly for the first time. That way you know it works. Don’t change the recipe the first time, paying attention to every detail. You can get creative later on.
My dough was too dry.
You did not aerate your flour before measuring. Flour always settles in the bag or container and must be aerated before measuring; otherwise, you will be using too much flour. To aerate flour, using a large spoon or spatula, stir the flour around to incorporate some air. To see a short video on how to aerate flour, click here.
You measured the flour incorrectly. To measure flour, use a flat-topped measuring cup, gently spoon the aerated flour into the cup until it’s mounded above the rim and level off the excess with the back of a knife. Do not tap the cup or the container of flour.
You changed the recipe or used whole wheat flour.
My dough was too runny.
You used too much liquid or not enough flour. Use a cup specific for measuring liquids, have it on a flat surface and view it at eye level to make sure your liquid is at the correct line.
You sifted the flour before measuring, which would cause you to use less flour than required. Never sift flour before measuring unless specified in the recipe. You should only aerate your flour before measuring. (see my Flour Basics on how to aerate flour)
You changed the recipe.
My bread wasn’t cooked inside.
Your oven (and pot) were not preheated long enough. Use an oven thermometer to make sure your oven has reached 450°F. It can take over half an hour.
You sliced it too soon. After bread is removed from the oven, it will continue to cook inside. It’s best to let it cool completely before slicing (I know it’s hard to wait!)
My bottom crust was too hard.
Your pot was too close to the heat. Try raising the oven rack so the bottom is not as close to the heat.
Your oven may be hotter than you think. Use an oven thermometer to assure your oven is the proper temperature.
Try placing a baking pan on the rack below the bread to block some of the heat.
Try a slightly lower temperature by preheating to 450°F but lowering the temperature to 425°F to bake.
If using a black cast iron pot, try another one that is not black.
Do not bake any longer than indicated.
Put extra layers of parchment paper on the bottom. Reynolds “Cookie Baking Sheets” come folded so there are four layers. Place one on the bottom just before putting the dough in to bake.
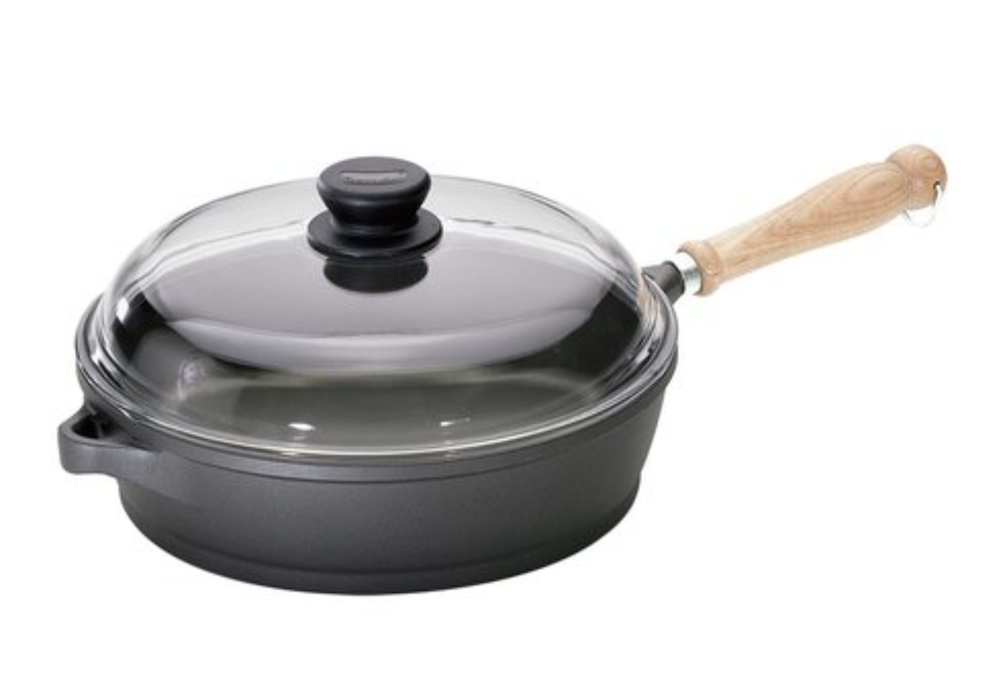
I don’t have a Dutch oven.
I have only made this bread in an enameled cast iron Dutch oven (Le Creuset) but other people have commented that they had success using:
a glass pyrex dish with a lid
a stainless steel pot with a lid
a stainless steel pot with foil on top and the original pot lid over the the foil
a clay baker
a springform pan with an aluminum foil top
a pizza stone with a stainless steel bowl as a cover
several people posted here that they used a black cast iron pot with a lid
a roasting pan with a tightly sealed foil heavy duty top
a heavy soup pot with a lid
a corning dish with a glass lid
a Romertopf clay pot
a crock pot bowl with a lid
two nonstick bread pans, no parchment paper – put the dough in one of the bread pans, flip the other pan upside down over the first pan and put binder clips on the two ends to hold the pans together.
an oven-safe stoneware insert (removed from a slow cooker) with a cookie sheet over it as a lid.
a cast iron skillet and foil as a lid
2 1/2 quart corning ware casserole.
Keep in mind that any lid must be tight fitting because you need to create steam inside the pot and the lid should have an oven-proof handle (not plastic). Your pot will need to hold at least 3 quarts but 5 to 6 quarts is most common. Or… You can make my No Knead Ciabatta Bread or No Dutch Oven Bread – they both bake on a pan, no Dutch oven needed. Click here for the recipes.
My parchment paper stuck.
If your parchment paper stuck it’s from using an inferior brand. Reynolds brand will never stick. If you can not get Reynolds brand you need something to lift the dough and place it in the Dutch oven. You can try using a well floured kitchen towel to transfer the dough, letting the dough roll off the towel into the hot pot. Do not leave the towel in the pot, only use it as a means of lifting the dough. Do NOT use wax paper in a hot oven. It will melt onto the bread and it will be ruined. I don’t use a towel because my dough always sticks to the towel. Parchment paper makes the job super easy but inferior papers can stick. I always use Reynolds brand – it never sticks.
I don’t have parchment paper.
You can make no knead bread without parchment paper. Parchment is the easiest way to lift the dough and place it into the hot pot.
Another way is to place the dough directly into the (ungreased) hot pot. You have to be careful because the pot is very hot.
Some recipes use a floured towel to rest the dough and you would use the towel to transfer the dough into the pot, letting it roll off the towel in to the hot pot. For me, the dough usually stuck to the towel, even though it’s floured, so I switched to parchment paper.
Can I add extras to the dough and when should I add them?
You can add extras to your dough at the very beginning when you first mix it up.
I have added nuts, raisins, sugar, caraway seeds, 10-grain cereal, oats, and olives. You can see all my variations in the No Knead Breads category.
Other commenters say they have added: cheese, rosemary, Italian herbs, crushed garlic, garlic powder, blueberries, cranberries, honey, cinnamon, molasses, jalapeno peppers, olive oil, sun dried tomatoes, maple sugar, and “Everything But The Bagel.”
Can I double the recipe?
A helpful woman named Marion says yes. “I doubled everything, flour, yeast, salt and water. Used 5 quart Dutch oven. It was a little tricky getting the folded dough into the paper basket but otherwise smooth sailing! I’ve seen this question up here many times and no one has answered it, so that made me think it might be a no-go but actually it’s great.” (Thank you, Marion)
I live at a high altitude. Any changes needed?
Several people have commented that they live at high altitudes (from 4,500 to 8,400 feet) and made no changes to the recipe, and their bread turned out very well.
How do I aerate flour?
Flour must be aerated before measuring because it often settles in the bag or container making it heavy and compact, resulting in too much flour being measured. Aerating basically means fluffing it up and is not the same as sifting. Flour should not be sifted before measuring unless the recipe states to do so. Sifting will result in too little flour being measured.If you dip into flour without aerating, you will be getting too much flour and your dough will be too dry. To aerate flour you simply stir it around with a spoon before measuring. To see a short video on how to aerate flour, click here.
After aerating, be sure to use a flat-topped dry measuring cup. There are two ways to measure the flour: 1) Scoop & Level – Gently scoop the flour up with a spoon and sprinkle it into your measuring cup until it’s mounded above the rim. Do not tap the cup or the container of flour. Finally, level off the excess flour with the back of a knife. 2) Dip & Level – Gently dip your measuring cup into the flour until it’s mounded above the rim and level off the excess flour with the back of a knife. Sources vary but in my kitchen, a cup of flour weighs between 4 1/2 and 5 ounces.
Can I make it with Gluten-Free flour?
Well…. you can make it with gluten free flour but you may not like it. I tried it and the loaf was smaller and more dense and chewy, without the traditional big holes and it didn’t taste anything like the original recipe. I tried it once but nobody wanted to eat it.
Can I make it with Sourdough Starter?
I’m sorry I have no experience with sourdough starter but there are many comments from those who have used it.
Don’t you need sugar to feed the yeast?
No. You do not need sugar to activate the yeast. This is a half-true old wives tale left over from when yeast wasn’t preserved as well as it is today.
Doesn’t hot water kill the yeast?
No. Hot water does not kill yeast but boiling water will. Today’s yeast is more sturdy and accommodating than years ago and can tolerate water or liquid up to 130°F. The killing point for yeast is 140°F.
What size Dutch oven do I need?
The ideal size of Dutch oven for no knead bread is 5 or 5 1/2 quart. I make mine in a 5 1/2 quart enameled Dutch oven but I have also made it in a Dutch oven that measures 3 1/2 quarts.
A Final Note: If you have followed my recipe exactly with no changes at all and it doesn’t look right before baking, don’t make adjustments to try to “fix” it. Trust the recipe, don’t change anything and continue as directed. You may be surprised that it turns out after all.
WITH BAKING, IT’S IMPORTANT TO FOLLOW THE RECIPE EXACTLY, RIGHT DOWN TO THE SIZE OF THE PAN. EVEN THE SMALLEST CHANGE CAN CAUSE A RECIPE TO FAIL.
Dough Didn’t Rise
Your liquid may have been the wrong temperature. Using an instant read thermometer is the best way to know it’s correct.
Your yeast may not be fresh and should not be used past the expiration date. Even with a good expiration date yeast has a short shelf life once a package is opened. Even with the small packets, once it’s opened, yeast should be tightly sealed and kept in the freezer, not refrigerated.
You used the wrong size pan. Using a larger pan than is noted lets the dough spread sideways instead of rising upwards.
You changed the recipe. It’s important to follow the recipe exactly, paying attention to every detail.
Dough Too Dry
You did not aerate your flour before measuring. Flour always settles in the bag or container and must be aerated before measuring; otherwise, you will be using too much flour. To aerate flour, using a large spoon or spatula, stir the flour around to incorporate some air. To see a short video on how to aerate flour, click here.
You measured the flour incorrectly. To measure flour, use a flat-topped measuring cup, gently spoon the aerated flour into the cup until it’s mounded above the rim and level off the excess with the back of a knife. Do not tap the cup or the container of flour.
You used a different flour than stated in the recipe.
Dough Too Sticky
You used too much liquid or not enough flour. Use a cup specific for measuring liquids, have it on a flat surface and view it at eye level to make sure your liquid is at the correct line.
You sifted the flour before measuring, which would cause you to use less flour than required.
You used a different flour than stated in the recipe.
Don’t you need sugar to feed the yeast?
No. You do not need sugar to activate the yeast. This is a half-true old wives tale left over from when yeast wasn’t preserved as well as it is today.
Doesn’t hot water kill the yeast?
No. Hot water does not kill yeast. Today’s yeast is more sturdy and accommodating than years ago and can tolerate water or liquid up to 130 degrees F. The killing point for yeast is 140 degrees F.
If your parchment paper stuck it’s from using an inferior brand. Reynolds brand always works for me. I got a cheaper parchment paper once and everything stuck to it. I only use Reynolds brand – it never sticks. (This is not a paid endorsement, I’m just sharing what works for me). NOTE: Wax paper is NOT the same as parchment paper. DO NOT USE WAX PAPER in the oven because it will melt onto your food.
PLEASE NOTE: I NEVER EXPECTED SO MANY INTERNATIONAL VISITORS AND HAD NO EXPERIENCE WITH MEASURING BY WEIGHT. THE GENERALLY ACCEPTED STANDARD FOR FLOUR IS LISTED IN BLUE AND HOW IT WEIGHS IN MY KITCHENIN RED.
Flour 1 cup = 4 1/4 ounces = Generally Accepted 120 grams – When I weigh I get 125-130 grams
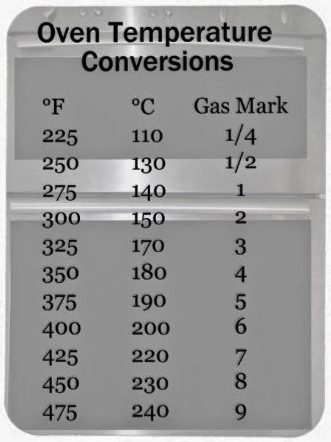
Oven Baking Temperatures 225 degrees F = 110 degrees C = 1/4 gas number 250 degrees F = 130 degrees C = 1/2 gas number 275 degrees F = 140 degrees C = 1 gas number 300 degrees F = 150 degrees C = 2 gas number 325 degrees F = 165 degrees C = 3 gas number 350 degrees F = 180 degrees C = 4 gas number 375 degrees F = 190 degrees C = 5 gas number 400 degrees F = 200 degrees C = 6 gas number 425 degrees F = 220 degrees C = 7 gas number 450 degrees F = 230 degrees C = 8 gas number 475 degrees F = 245 degrees C = 9 gas number 500 degrees F = 260 degrees C = 10 gas number
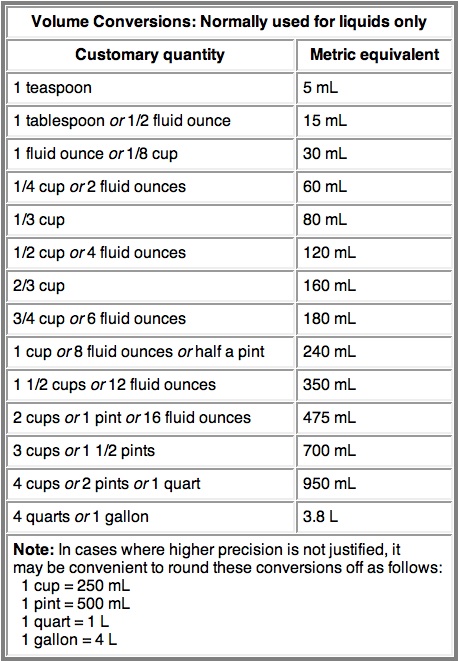
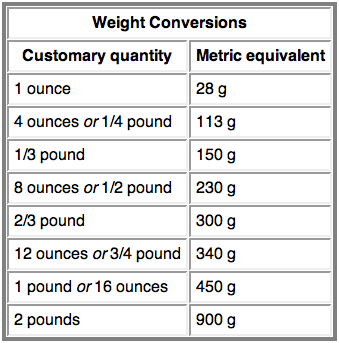
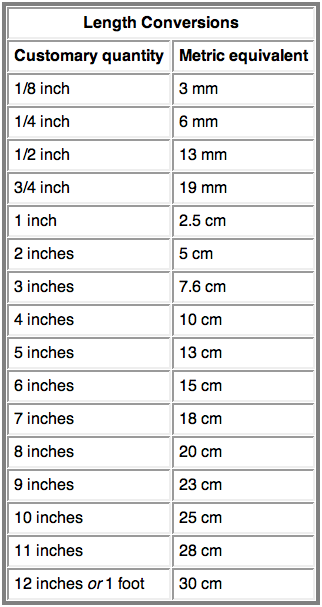
…Below are all the charts I had perviously posted, compiled from other sources…
I find most of my colorful tools and gadgets at Sur La Table, Pier One, World Market, Bed, Bath & Beyond, Target, Walmart, and even some drug stores, hardware stores and vintage shops. I’d rather go shopping for spatulas than shoes!
There is no need to try purchasing my cookbook, which is out of print now and is also out-dated. It was published in 2006 but since then I have evolved as a cook and have simplified and improved the way I cook. All of the best recipes from the book are posted here on this website, the way I make them today, so there is no need to buy the book.
If you’re curious, the book is available as a free download. Justclick here.