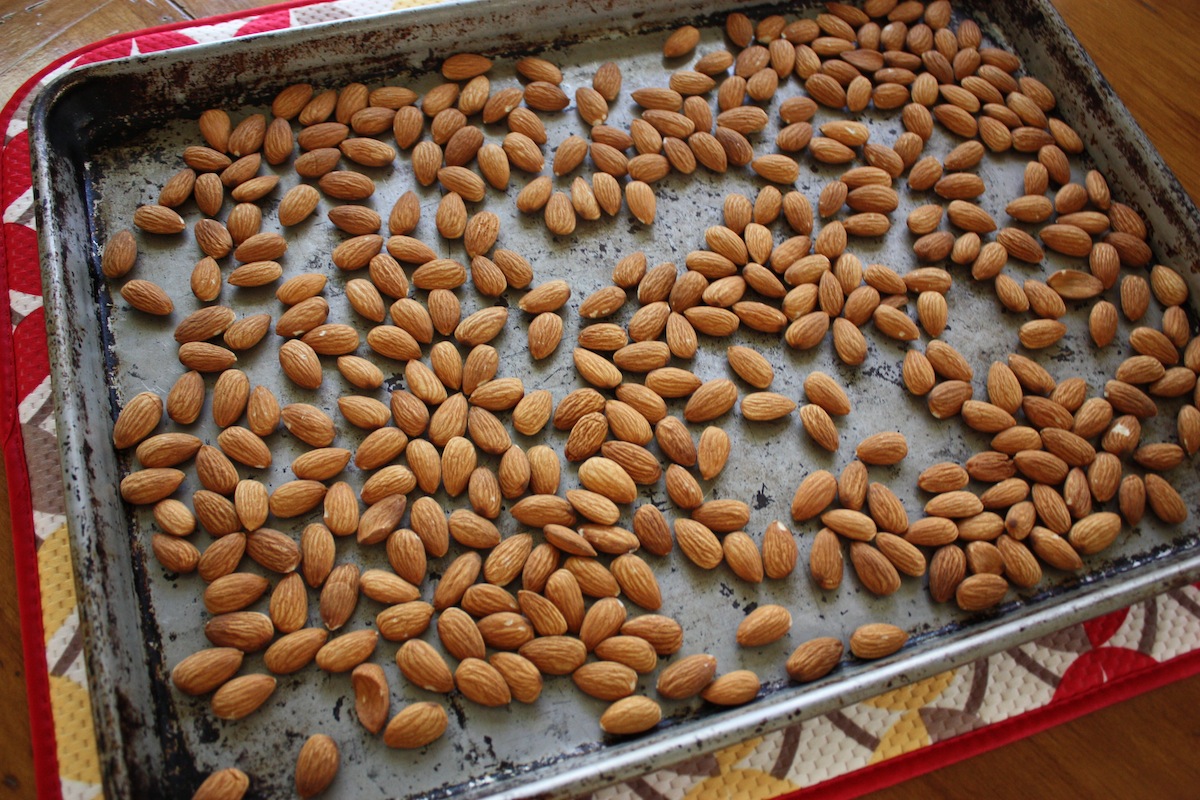
NEW RECIPE: I am done with peanut butter right now. Almond butter is a healthier spread and it tastes so much better, but you have to make your own because store bought spreads will never compare to homemade. All nut butters are easy to make and well worth doing. With almond butter, roasting the nuts is key and don’t be afraid to roast them well. Here is a tray I just took out of my toaster oven. Don’t be afraid to roast them really well but keep an eye on them towards the end.
Ovens are all different so roasting might take longer in a larger oven. That’s why I love my toaster oven – it’s a smaller space for the heat to circulate so things brown faster. When the almonds are done, you can tell by the darker color and especially by the fragrant smell. Nutritionally, almonds provide protein, healthy fats, vitamins, and minerals.
By the way, it’s a noisy process for a few seconds at the beginning so I always step away from the food processor when it starts. And at the end, it will look smooth but there is always some thicker paste on the bottom of the processor bowl. That’s why I stir it up from the bottom and process it a little more to mix it all together.
If you over-process it, it might be too runny. If you under-process it, it might be grainy, but it will always be delicious! 😋
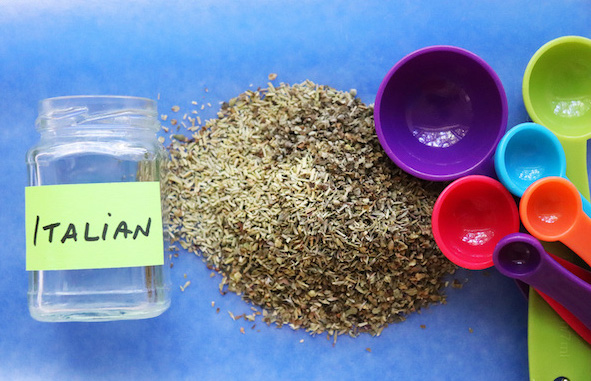
NEW RECIPE:One day I was out of my store-bought Italian seasoning mix and needed some for dinner. I thought about changing out of my pajama bottoms and favorite T-shirt to go to the store but that sounded like more work than making spaghetti and meatballs from scratch. So I decided to try making my own spice mix. That was the last day I ever used store-bought Italian seasoning mix. I can’t explain why but the mixture I came up with was just…. better. It smells better, tastes better, and smells fresher. It may be because I use a lot of basil, which is super fragrant. I just put all the ingredients on a piece of wax paper and pour it into a small jar, shake well, and it’s done. Homemade always seems to be better, even for spices. (not so much for hair coloring!)
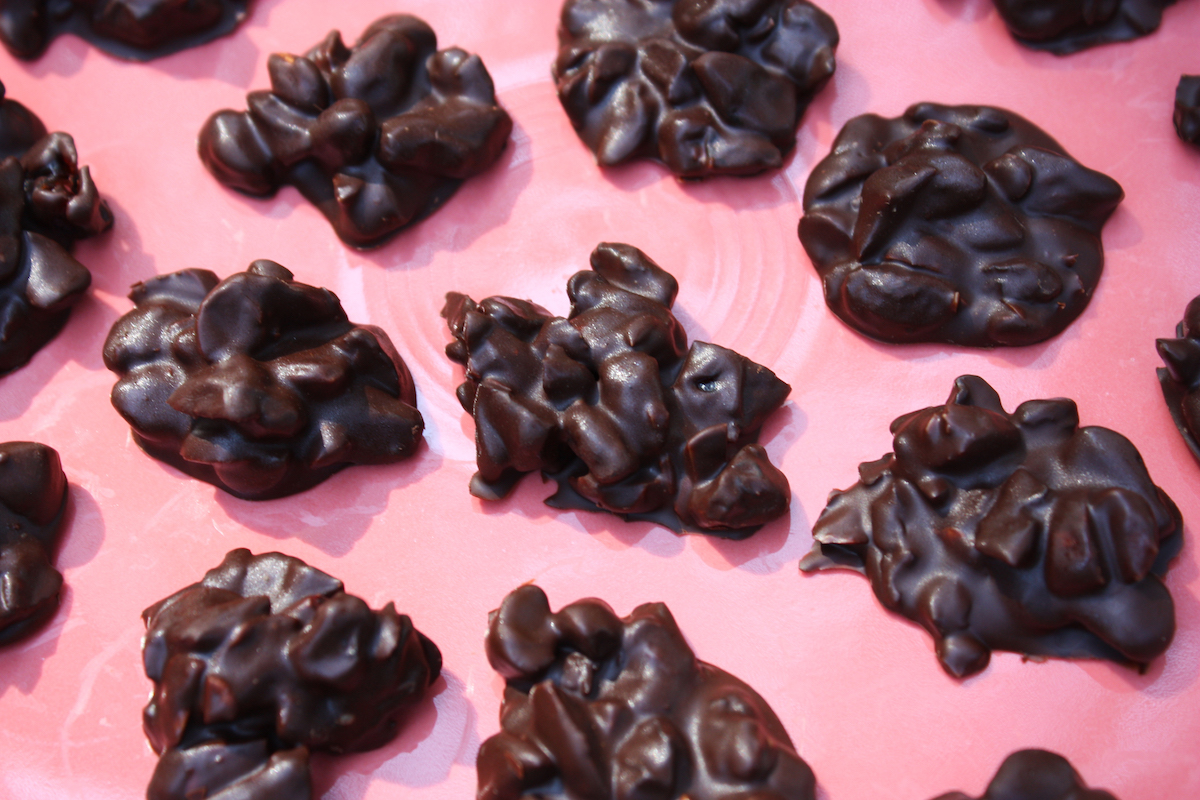
This is a variation of my chocolate almond clusters and I love it. Instead of using whole almonds, I chopped them into pieces and added some chopped dried cherries and raisins. The result is a wonderfully chewy, dark chocolate, healthy sweet treat full of protein, heart-healthy fats, antioxidants and fiber. I used a dark chocolate bar (72% cacao) from World Market and followed the same process as my original recipe but instead of using tiny paper cups, I just dropped the clusters onto wax paper, let them cool, and then refrigerate.
The easiest way to refrigerate them is to slide a cutting board under the wax paper and place the whole thing in the fridge until the clusters are cold and set. Then you can put them all into a covered container but always keep them refrigerated; otherwise, the chocolate will melt in your hands. Next time you’re craving a chocolate bar or some m&m’s, try this healthier homemade fruit & nut dark chocolate cluster. Click here for the recipe. – Jenny Jones
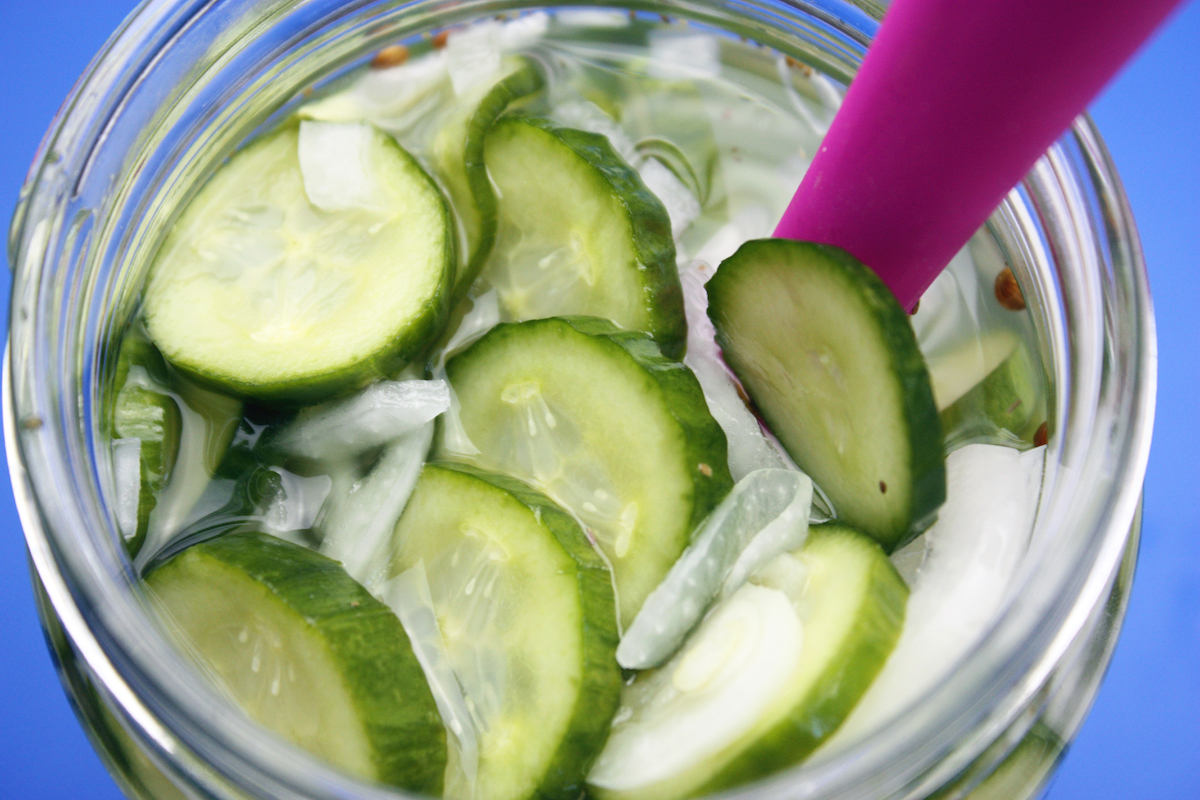
I found some beautiful fresh Persian cucumbers yesterday and made a full jar of my 3-hour bread & butter pickles. Today, there’s only half a jar left. You can make pickles using the traditional small Kirby cuces but Persians work just fine too, and they are available all year round. Mediterranean markets usually have the best ones. So today’s lunch will be a salmon sandwich on my multi-grain no knead bread with a bowl of these refrigerator pickles on the side, and a whole wheat double chocolate chip cookie for dessert. I should have just enough homemade pickles left for tomorrow. Click here for the recipe. – Jenny Jones
If you’re looking for Christmas gift ideas I can tell you from experience that everyone I know loves to receive homemade goodies. Cookies, breads, cupcakes, biscotti… you can hardly go wrong. And then there’s homemade caramel corn. OMG! This is a gift that everyone absolutely loves! It’s super crispy, light, and so delicious! That’s what I give every Christmas and people start asking me in October if I’m making caramel corn again this year. That’s because there is no store-bought product that even comes close. And my recipe is simple. You don’t need a candy thermometer or any fancy equipment.
I just pop the corn in the microwave (my paper bag method) and stir in an easy syrup (made in five minutes) with butter, brown sugar, vanilla, and corn syrup (this is not high fructose corn syrup – they are not the same). Then you stir it up and bake it. I don’t make it for myself very often because I can’t stop eating it. So it’s a Christmas treat for me too. If you want to feel like Santa Claus next week and see big smiles on happy faces, give homemade caramel corn. Click here for the recipe. – Jenny Jones
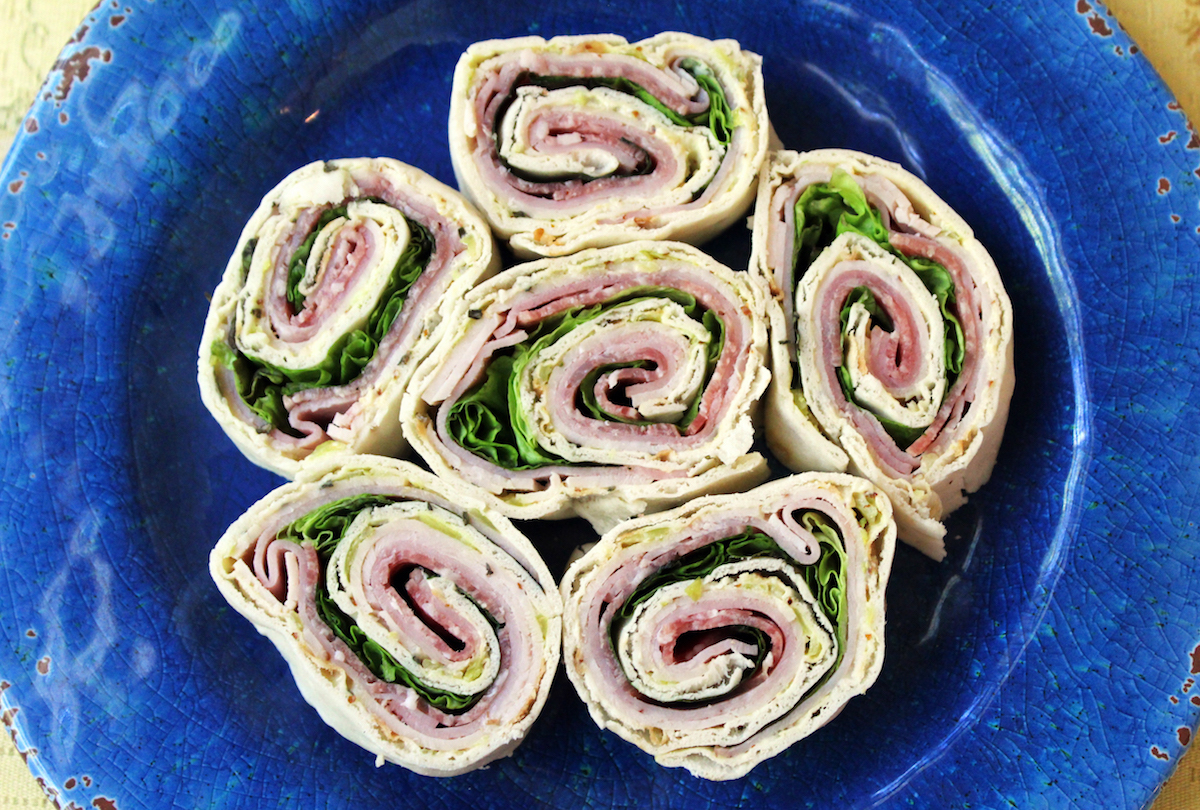
There’s always something to snack on over the weekend in this house. Sometimes it’s my skinless chicken drumsticks but today it’s my Italian sub pinwheel sandwiches. Today I skipped the cheese and made them with sliced roasted turkey breast, nitrate-free ham, and light salami. The salami is what give them an Italian sub flavor. So here’s what’s inside my lavash bread…. mayo, mustard, Italian seasoning, diced peperoncinis, turkey, ham, salami, and lots of lettuce.
I rolled them up, wrapped them tightly in plastic wrap, and refrigerated them for about 3-4 hours. Then I sliced them, covered the plate tightly with plastic wrap, and now they are in the fridge, ready for the weekend. Some people add cream cheese or other different meats so you can make them your own. It’s the perfect TV snack if you’re watching the Olympics this weekend. Click here for the recipe. – Jenny Jones
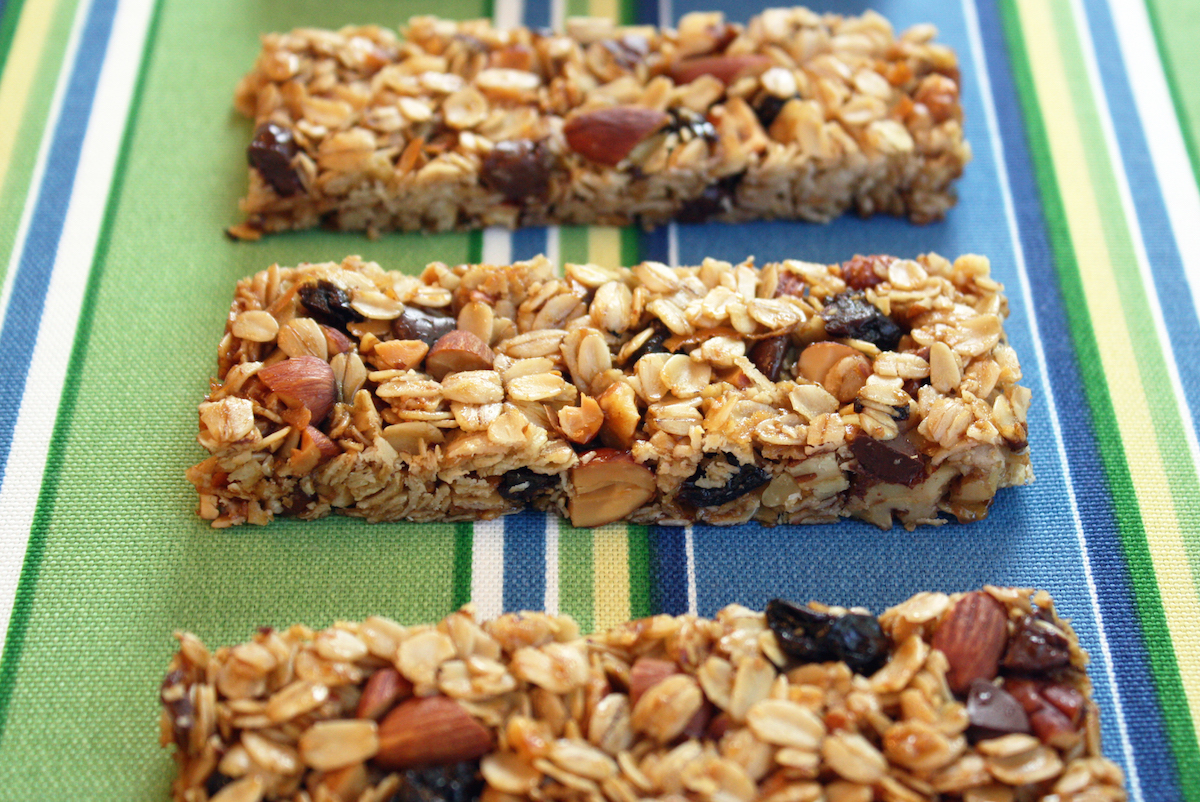
If you’ve ever wondered which one of my recipes I make the most, it’s granola bars. I make them almost every week. Granola bars were never my favorite thing to eat but I would occasionally buy one when I was away from home and getting hungry because it’s a healthy choice but the ones from the store never left me wanting more. These days I crave granola bars because homemade bars are infinitely better… and easy to make.
I make sure we always have these delicious bars at home and as soon as we run out, I make more. They are full of protein and fiber and they are incredibly easy to make. Everything mixes in one bowl and you bake it.
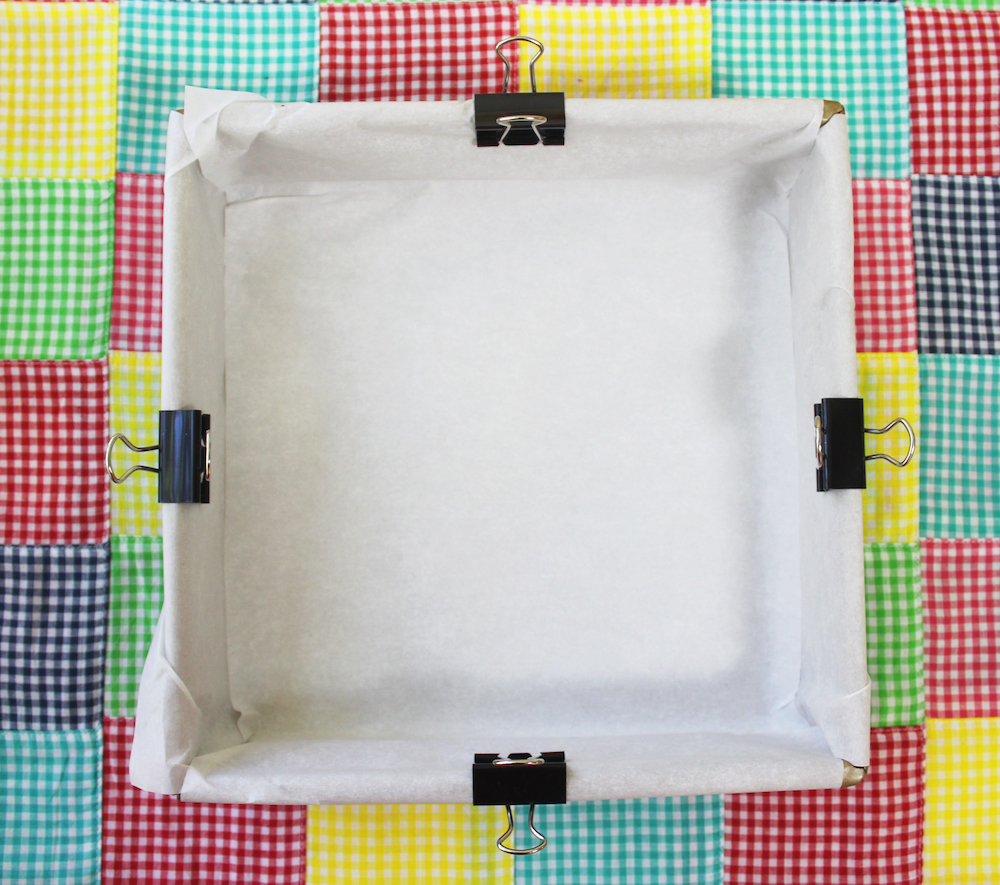
How To Line a Pan for Granola Bars (with Parchment Paper).
The hardest part is lining the pan with parchment paper because it won’t always stay in place, but I found an easier way to do it… with binder clips. You can get them at a stationery store and since they’re metal, they can go right in the oven.
Cut two parchment paper pieces a little bit wider than your 9-inch pan and lay them in, criss-crossing each other, clipping the ends down as you go. It will keep the paper in place, like this…
Now that you know how easy it is to make your own granola bars, try them and see if you don’t wind up like me, making them every week. Every time I go out the door, I take one with me. You will too. Click here for the recipe. – Jenny Jones
Boy, these are good! They’re easy to make and perfect for a 4th of July party. I’m sharing this idea for the upcoming holiday weekend because I made these Italian sub pinwheels sandwiches for a party once they were a huge hit. But this was a hard recipe to write up because I know everyone will be using different products, depending where they live and what their stores carry. But I did my best.
About the bread: Lavash is perfect for pinwheels because it’s rectangular and easy to roll to get even sandwiches. I used both whole grain lavash and white lavash in this photo but whole grain is my first choice to make these little gems as healthy as possible. I’ve seen lavash in two sizes, 8 by 10 and 9 by 12. If your store doesn’t sell it you can usually find it in a mediterranean or Armenian grocery store. But you can always use large flour tortillas as well.
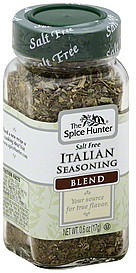
About the filling:My Italian sub pinwheel is made with some traditional sub fillings like ham, salami, and cheese. But you can make this healthier by choosing nitrate-free ham and salami (I use Applegate brand ham) and I use ultra-thin sliced cheese. Mozzarella is my choice but provolone is also good here. Even the meats should be sliced as thinly as possible for easier rolling. My Italian seasoning blend (Spice Hunter brand) is a combination of basil, rosemary, marjoram, thyme, sage, and oregano. If you don’t have a blend, you can use oregano.
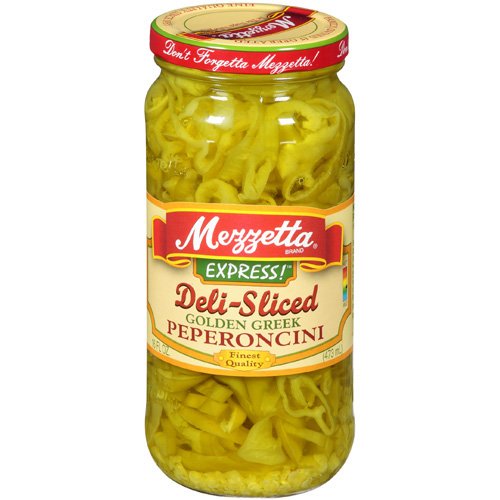
Peperoncini is key to making these taste just like an Italian sub. You can buy them in a jar already sliced.
Oh, and use lots of lettuce. It looks pretty and it’s a healthy green.
About serving: These sandwiches must be made ahead of time, preferably overnight, but at least three hours in advance to give them a chance to hold together and for the bread to moisten. It’s important to roll them up slowly, as tightly as you can, and wrap each roll (you ARE making more than one, right?) in foil and refrigerate. When it’s time to serve, use a sharp serrated knife to cut a little off the ends and then slice the roll into 3/4-inch sandwiches. Place them on your serving plate and keep them covered with plastic as long as you can because they will dry out if left uncovered. But they don’t usually stay around that long. I always serve them with some vegetables – either carrots sticks, cucumbers, or just a plate of crudite.
Other variations: Oh wow, I have made so many different variations. Here are some ideas:
~Turkey and swiss with mayo, mustard, and baby spinach. ~Roast beef with spicy horseradish mustard and lettuce. ~Ham & cheese with cream cheese spread and lettuce. ~Roasted and cooled veggies (peppers, zucchini, onions) with a hummus spread & baby kale. ~Chicken-pesto: Pesto spread (my spinach pesto recipe) with sliced chicken, mozzarella & baby spinach. ~Spicy: Cream cheese mixed with canned “hot” diced green chiles, sliced chicken breast, & lettuce. ~Leftover roast turkey with leftover fresh cranberries (my recipe) as a spread. (I’m making this after Thanksgiving!)
~There are endless variations: add finely sliced onion, olives, pickles, roasted red peppers, shredded carrots, etc., etc., etc.
Click here for the recipe and have a great 4th of July weekend! – Jenny Jones
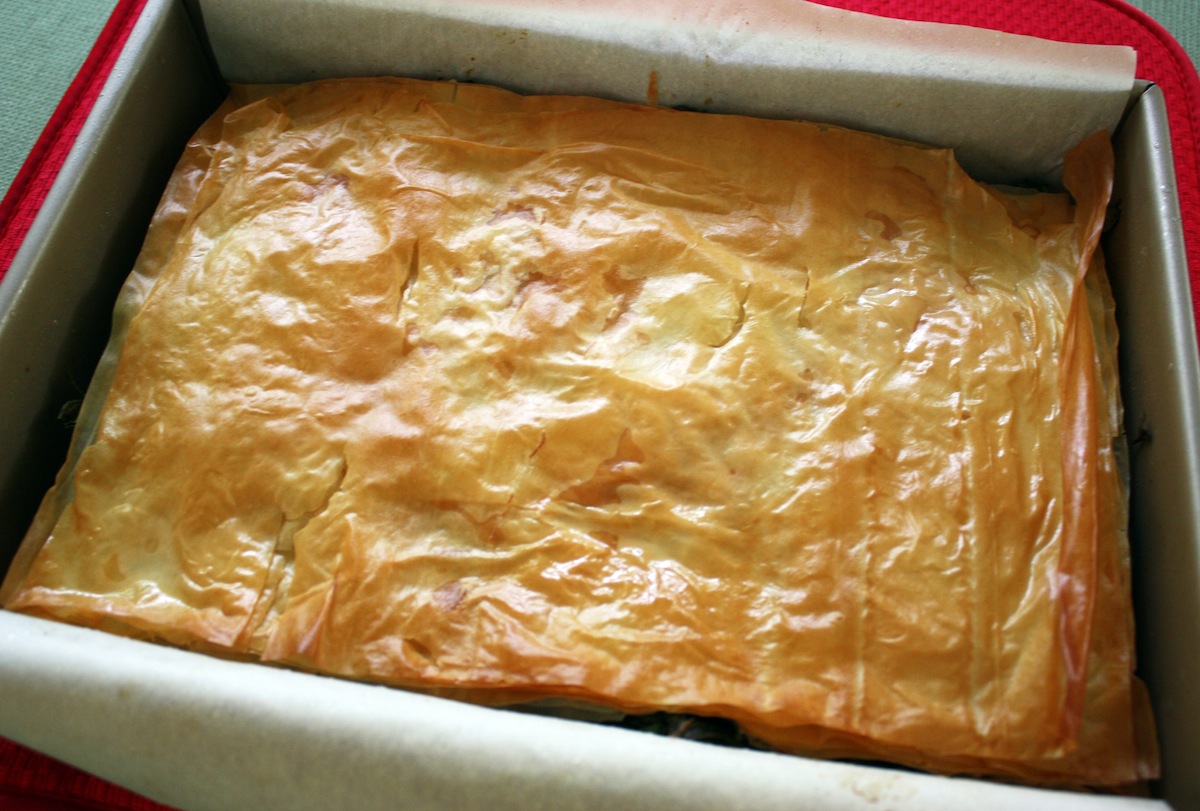
I love Greek spinach pie so much I had to come up with an easier way to make it – and I have. The old way meant washing spinach about five times to get the sand out, cooking the spinach, draining the spinach, etc., etc., and then brushing the phyllo with oil and having it stick to the brush and break into pieces. And cutting it in the pan was never easy.
But oh… I have a much easier way to make this incredibly delicious Greek treat. Here’s what you won’t have to do:
No washing of spinach.
No cooking of spinach.
No draining of spinach.
No struggling to cut it in the pan after it’s cooked.
With the traditional method, a pastry brush is used to grease each layer of phyllo but using an oil mister makes the job easier. A mister is easier, faster, and it also keeps the delicate phyllo sheets from breaking. (my mister is made by Prepara) And using parchment paper means you just lift the whole thing out onto a cutting board for easy slicing.
My recipe uses pre-washed packaged baby spinach and I use it fresh, without pre-cooking because it cooks quickly inside the pie. Most spinach pies have a dense spinach filling from either pre-cooking or even worse using frozen spinach. Using fresh baby spinach is less work and it makes a less dense filling with a delicious light texture.
You must plan ahead if you’re going to make this recipe because the phyllo comes frozen and you need to thaw it overnight in the fridge and then bring it to room temperature before using. I forgot to thaw it once and just placed it on the counter top for a few hours and it did thaw, but it kept breaking into pieces.
The reason I make Greek spanakopita is because once I tasted my own with the fresh filling and the flaky layers of phyllo, I can never buy it anywhere again. Nothing comes close. If you like Greek food, you must try this recipe. I won’t say it’s easy but it’s definitely easier than most and the pie is so incredibly light, I’ve been known to eat four as a snack. Yes… four. Click here for the recipe. – Jenny Jones
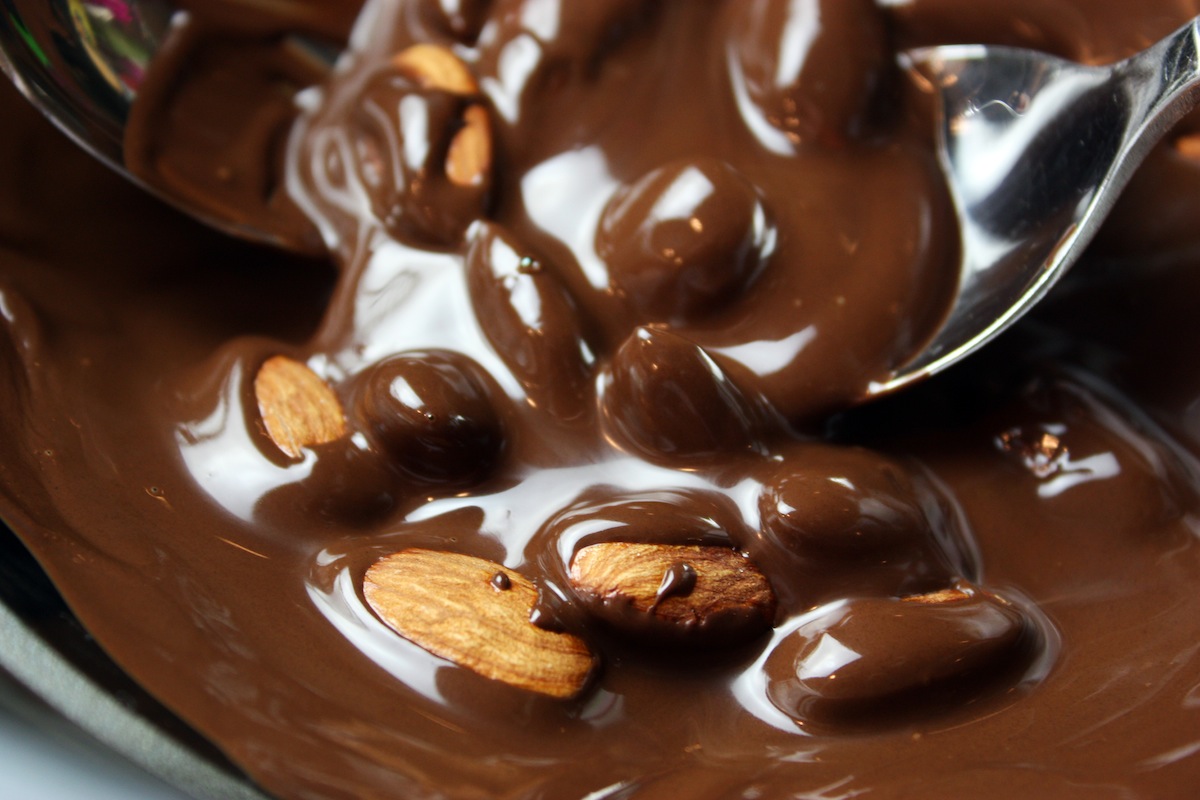
Goodbye Snickers. Goodbye Mr. Goodbar. There’s a healthier way to get your chocolate-crunchy-nutty fix and you can make it yourself in fifteen minutes. With only TWO ingredients! It’s really easy, and they’re really good. I’m basically melting a good quality dark chocolate bar and dropping in some toasted almonds. My favorite chocolate bars for this recipe are Ghirardelli Semi-Sweet, which comes in a 4-ounce bar and Scharffen Berger 62%, which is 3 ounces. World Market also makes a good 72% 3-ounce bar. I do this with a double-boiler method but who has a double boiler these days? Not me.
So I put a glass pyrex bowl on top of a small saucepan with about an inch of water and that’s my double boiler. It’s important that the bottom of the bowl does not touch the water and that you do not use a rapid boil. Just bring the water to a boil and then to a low simmer to melt the chocolate. I break the chocolate bar (3 ounces) into chunks, into the bowl, and let it melt, stirring occasionally. While it’s melting, I set out fifteen little one-inch candy paper cups. They’re like cupcake liners but smaller.
When the chocolate is melted, turn off the burner and start dropping in the nuts. Stir them around until they’re coated and lift them out in clusters, using 2 teaspoons, and drop them into the cups. At the end, whatever chocolate is left can be taken up with a little spatula and dropped onto some of the clusters. You may have to re-warm the chocolate at the end. I have made these clusters without the paper cups and just dropped them onto wax paper to cool and it works, but they will spread. The cups make a nicer presentation too.
I strongly urge you to toast the nuts and not to use plain raw almonds. Toasting nuts greatly enhances their flavor and aroma and you can do that in advance. I just toast all the nuts I use at one time and keep them refrigerated for my baking. I do a sheet of walnuts, then pecans, and then almonds and they are always available without having to wait for them to cool. I just did some over the weekend.
To toast nuts place them on an ungreased baking sheet into a 350° F preheated oven for 7 to 10 minutes. It’s good to stir and turn them over about half way through. If you do a whole bag of almonds and have them on hand, you’ll be glad you did because you will make these chocolate clusters again, especially when you see how easy this is. The whole process takes about 15 minutes. And I’d like to see you eat just one. Click here for the recipe. – Jenny Jones

 NEW RECIPE: I am done with peanut butter right now. Almond butter is a healthier spread and it tastes so much better, but you have to make your own because store bought spreads will never compare to homemade. All nut butters are easy to make and well worth doing. With almond butter, roasting the nuts is key and don’t be afraid to roast them well. Here is a tray I just took out of my toaster oven. Don’t be afraid to roast them really well but keep an eye on them towards the end.