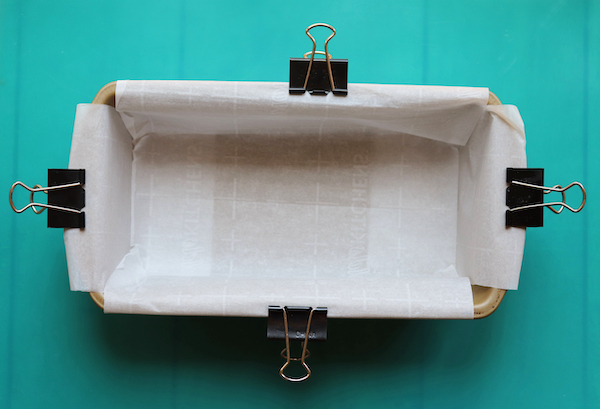
This is the easiest and fastest way I found to line my loaf pan with parchment paper. I use the pre-cut Reynolds cookie baking sheets. I cut one in half and cut one of the two halves into two. I clip the two smaller pieces onto each long end and then place the larger piece across the width and clip to keep in place. After I pour in the batter, I remove the clips and bake but you can leave the clips in.
FOR A COMPLETE LIST OF ALL MY HOW-TO TIPS, Click here.
FOR A COMPLETE LIST OF ALL MY HOW-TO TIPSClick here.
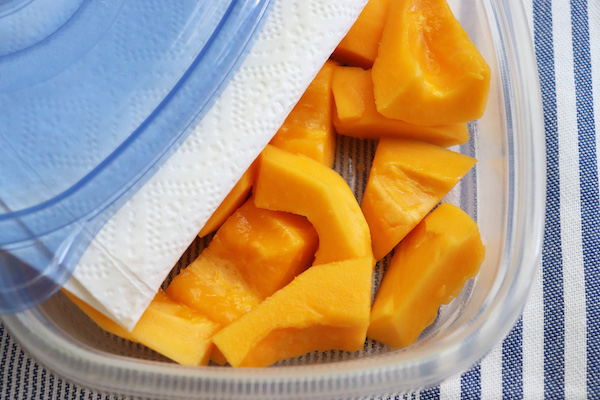
Most of us are not grocery shopping as often as we used to and that includes me. I go once a week during the “geezer hour” when they open early for us seniors. So I had to figure out the best way to store my cut fruit and veggies so they would last all week. I always have some crudité on hand as well as cut papaya or melon. I store them in those Glad plastic containers and I noticed that moisture always accumulated inside but on the underside of the lid and moisture is not a friend to cut fruit or vegetables.
I tried lining the container with a paper towel but the moisture still did its damage. Then I tried putting a piece of paper towel or a napkin on top of the fruit to keep the moisture from dripping down on the fruit. Guess what? It works! The paper on top of the cut fruit keeps the excess moisture away and now my cut papaya keeps all week and my crudité of carrot & cucumber slices and cabbage wedges stays fresh twice as long as before. I just wanted to share this tip for everyone else who is eating lots of fruits and veggies. You ARE eating lots of fresh fruit and vegetables, right? What was that? “I try…???” Don’t get me started! ?
Fresh fruit and vegetables are the lifeline to good health. ???? So here’s a new rule: You can’t make any of my breads until you’ve had some fruit and veggies. Don’t make me come over there! ?
FOR A COMPLETE LIST OF ALL MY HOW-TO TIPSClick here.
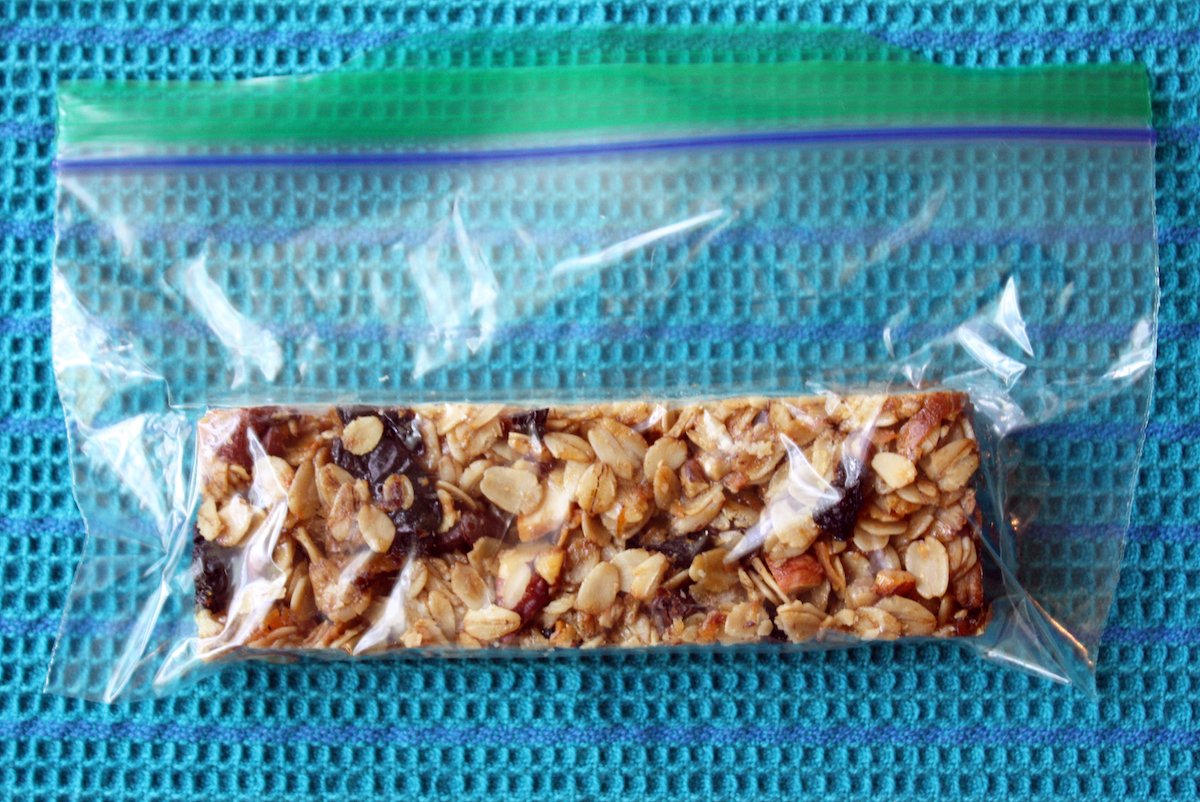
I make more granola bars than almost any other recipe and I always have them available to take along as a snack in my purse or in the car. The best way to store granola bars is to wrap each one in a separate snack size plastic bag with all the air removed. Then keep them refrigerated and they last for weeks. Whenever I leave the house, I put one in my purse, or I put a few in my purse to give as gifts. Everyone loves a homemade granola bar so if you make them, consider giving them as gifts. By the way, these little plastic bags can be re-used. If you want to make these delicious and easy homemade granola bars, click here for the recipe. – Jenny Jones
FOR A COMPLETE LIST OF ALL MY HOW-TO TIPS, Click here.
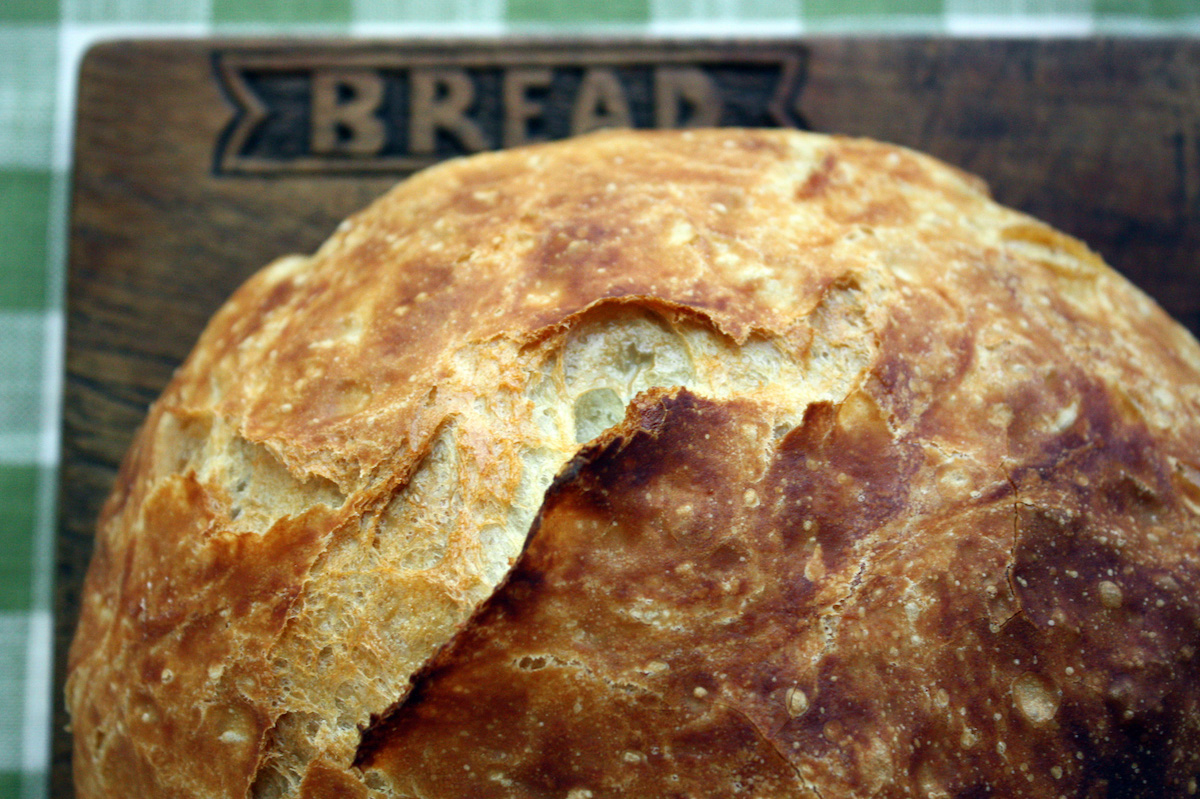
The fact is that homemade bread will not keep as well as store bought bread but in spite of that, homemade bread will always taste better. It’s best enjoyed the first day so after you have slathered the first few slices with butter (oh, yeah! ?) freezing what’s left on the first day is the best idea. I suggest slicing and freezing it so you can thaw only the slices you need. (I separate my slices between wax paper for easy separation.)
If you do not freeze your bread the first day, here are a few tips:
1. Crusty bread can be stored uncovered at room temperature for the first day. By the end of the day, it’s best to wrap it in foil (not plastic) or in a paper bag and kept at room temperature for a second day. After the second day, it’s really best to freeze it.
2. Crusty bread will not be crusty the second day. You can re-crisp it by putting it cut side down on a piece of foil and place in a preheated 325° F oven, directly on your oven rack, for about 7-10 minutes.
3. Crusty bread should not be stored in plastic, which softens the crust. Aluminum foil is a better choice.
4. Crusty rolls are best frozen the day they are baked. To re-crisp, place frozen rolls directly on the oven rack in a preheated 325° F oven for 10-12 minutes. They’ll be even more crispy than first-baked.
5. A standard soft loaf is best stored tightly wrapped in foil or plastic at room temperature up to 2 days and after that should be refrigerated or frozen.
There is a lot of differing information available about storing homemade bread – not everyone agrees with storing bread in the refrigerator but it works for me. Feel free to add your own tips if you like. – Jenny Jones
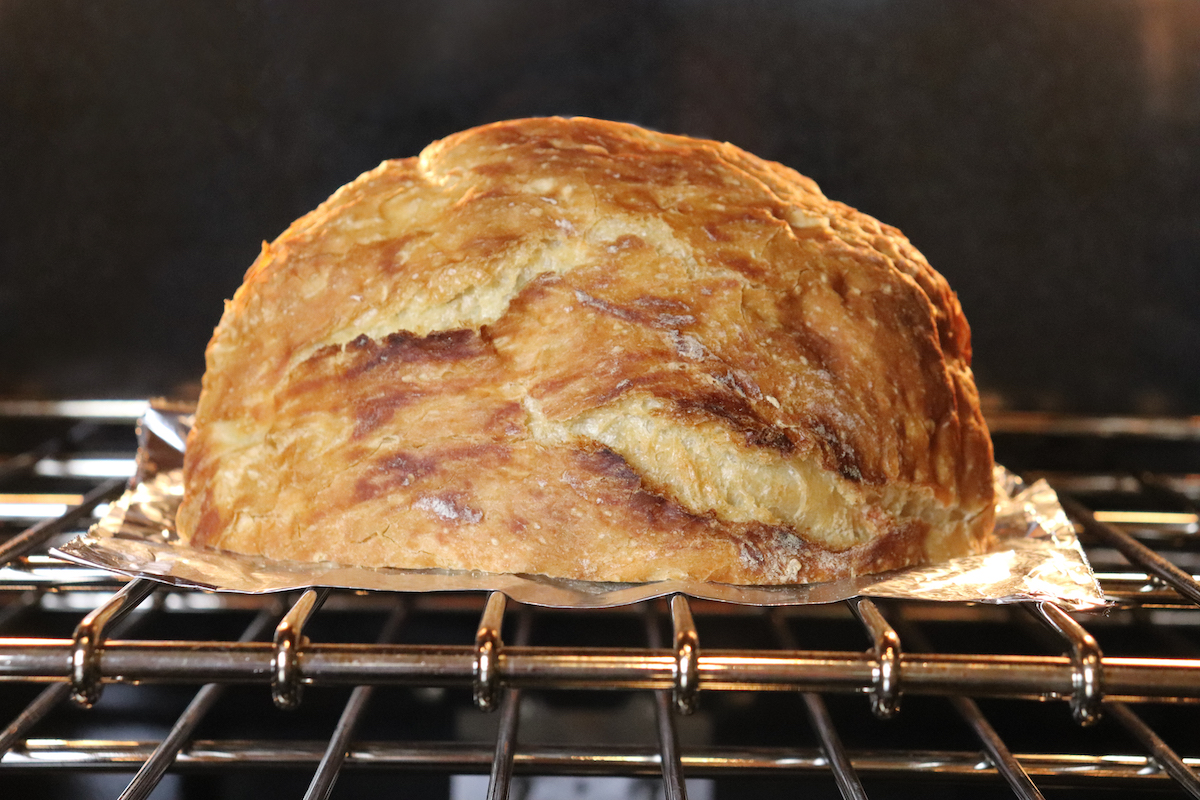
For anyone wondering how to re-crisp a crusty loaf of bread, here’s how I do it. A lot of us are making no knead breads and the crusts don’t stay crispy forever. My way of restoring the crust is to put it back in the oven but you don’t want to dry out the cut side. Once the loaf is cut I press some foil on the cut side and place the loaf cut side down directly on the oven rack (the oven should be preheated to 325°F). I tried spraying the crust with water first and it didn’t seem to make much difference. Bake the loaf for 7-10 minutes and it will crisp right back up.
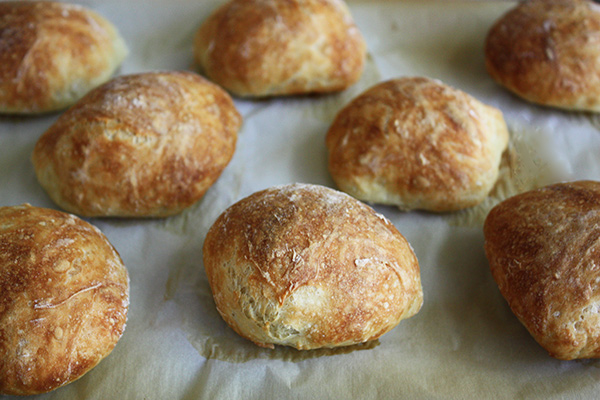
Make ahead dinner rolls are the best way to have fresh, crispy rolls whenever you want because day old bread is never as good as bread or rolls just out of the oven. So when I make my no knead crusty rolls, I freeze them within a few hours. It’s so easy to reheat and re-crisp these dinner rolls whenever you need them, even at the last minute.
The best way to reheat my crusty dinner rolls is straight from the freezer to the oven. First, preheat the oven to 325° F and just place the frozen rolls right on the oven rack (no baking pan) for 10 to 12 minutes. They will be even more crusty than when first baked.
There’s no need to thaw them overnight in the fridge. From my experience this is the best way to reheat crusty rolls. They’ll be super crispy on the outside and soft and moist inside. And if you haven’t tried these easy no knead rolls (they are one of my most popular recipes) try them and see how easy there are to make. – Click here for the recipe. – Jenny Jones
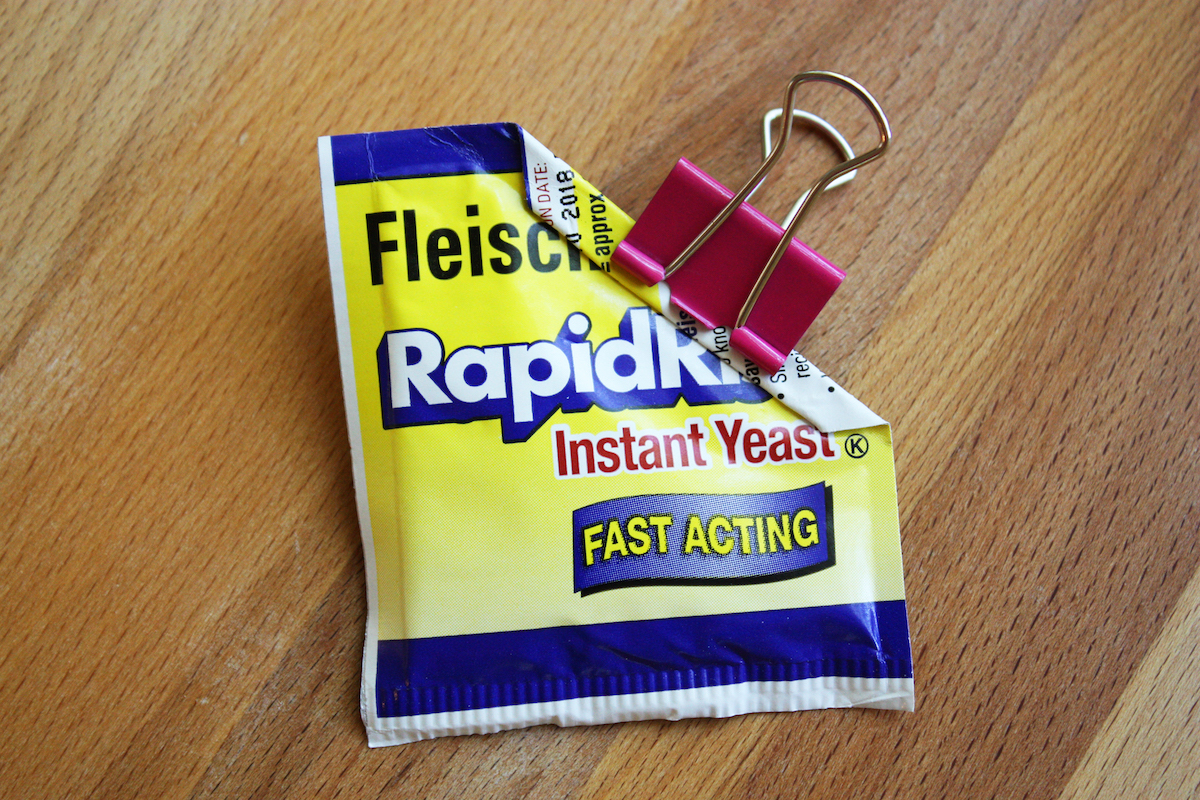
Yeast has a short shelf life and once any package of yeast has been opened, it should be kept in the freezer. I always use the small packets and I find that using a butterfly clip, the kind you can get at an office supply store, is a good way to seal up the packet for freezing. A paper clip would also work. I snip off the corner of the packet, measure what I need, fold the open corner over twice and seal it with the clip. Then I pop it in the freezer. – Jenny Jones
If your tortillas are not soft there can be several reasons:
You did not use all purpose flour.
You did not use a cast iron pan.
Your pan was not hot enough.
You did not roll them thin enough.
They are not stored properly.
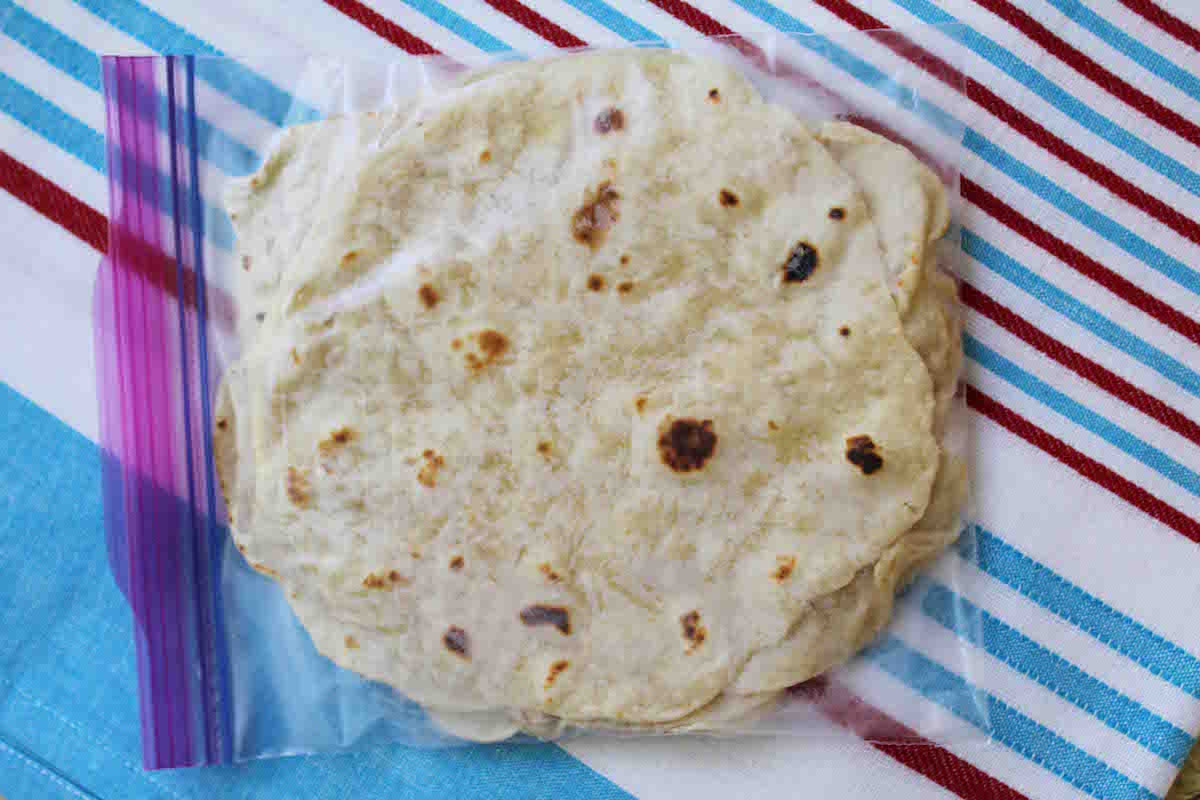
I store mine in a zip top plastic bag (put them in while they are still warm) and then close it up and remove all the air. Mine are always soft and every time I remove one, I close the bag back up, air removed each time. I keep them refrigerated this way for as long as 10 days. If you want to make your own homemade tortillas, click here for the recipe. – Jenny Jones
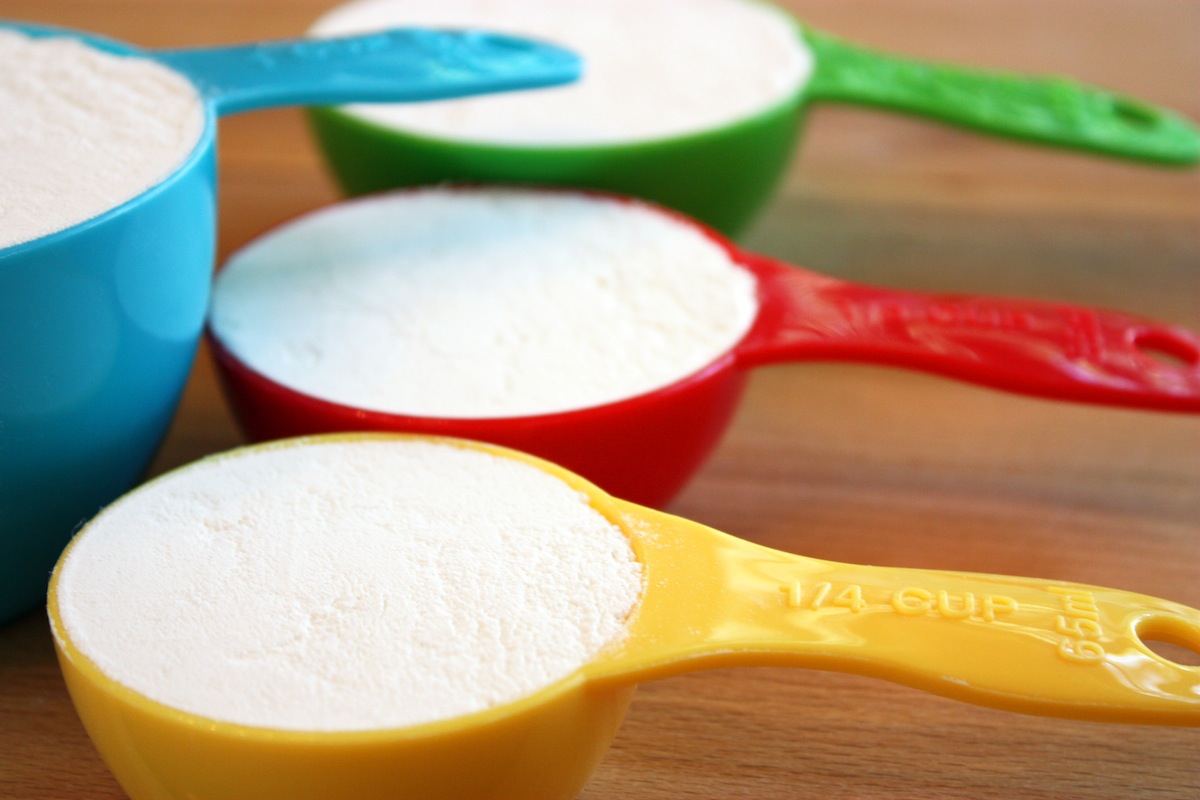
Flour must be aerated before measuring because it often settles in the bag or container making it heavy and compact, resulting in too much flour being measured. Aerating basically means fluffing it up and is not the same as sifting. Flour should not be sifted before measuring unless the recipe states to do so. Otherwise sifting will result in too little flour being measured.
If you dip into flour without aerating, you will be getting too much flour and your dough will be too dry. To aerate flour you simply stir it around with a spoon before measuring. To measure, be sure to use a flat-topped dry measuring cup. You can see how I aerate flour in my Quick and Easy Chocolate Cake video at the one minute mark: Click here to see it.
After aerating, there are two ways to measure the flour: 1) Scoop & Level – Gently scoop the flour up with a spoon and sprinkle it into your measuring cup until it’s mounded above the rim. Do not tap the cup or the container of flour. Finally, level off the excess flour with the back of a knife. 2) Dip & Level – Gently dip your measuring cup into the flour until it’s mounded above the rim and level off the excess flour with the back of a knife. In my kitchen, a cup of flour weighs 4 1/2 ounces (130 grams).