
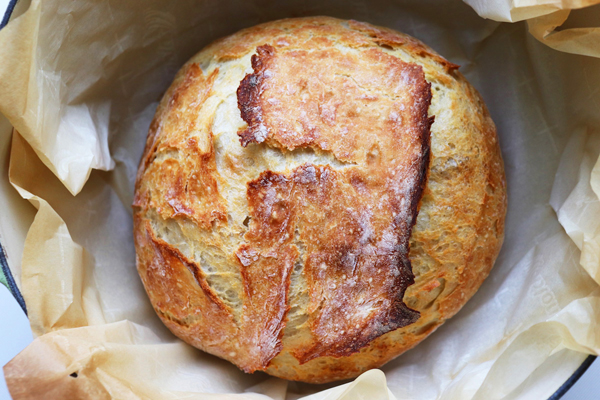
2-Hour Fastest No Knead Bread
This recipe uses MORE YEAST than my Faster No Knead Bread. The rest of the ingredients are the same. Be sure to aerate (not sift) your flour before measuring. PLEASE SEE MY METRIC CHART ABOUT THE FLOUR. - Jenny Jones
Prep Time: 3 minutes
Cook Time: 40 minutes
Total Time: 2 hours
Makes: One loaf

Ingredients:
- 3 cups (360-390g /12 3/4 ounces) bread flour or all purpose flour (AERATE FLOUR BEFORE MEASURING - See How)
- 2 TEASPOONS instant or RapidRise yeast (1 packet/7 g)
- 1 teaspoon salt
- 1 1/2 cups hot water (120° to 130° F)
- (about 2 Tablespoons extra flour for shaping)
Instructions:
- Combine flour, 2 teaspoons yeast, and salt in a large bowl. Stir in water until it’s well combined.
- Cover with plastic wrap and let stand at room temperature for 1 hour.
- After 40 minutes, place a 3 to 6-quart Dutch oven with lid in a cold oven and preheat to 450° F.
- After the dough has rested for the hour, place it on a well-floured surface and sprinkle with a little flour. Using a scraper fold dough over 10-12 times & shape into a rough ball.
- Place in a parchment paper-lined bowl (not wax paper) and cover with a towel or another bowl. Let stand on counter top for 15 minutes.
- After 15 minutes, carefully, using oven gloves, lift the parchment paper with the dough and transfer gently into the hot pot. (the dough sits inside a parchment "basket" inside the pot). Cover and bake for 30 minutes.
- After 30 minutes, remove lid and parchment paper. Return, uncovered, to oven and bake 10 - 15 more minutes. Let it cool at least 15 minutes before slicing.
METRIC: The standard for weighing flour is 1 cup = 120 grams. But when I weigh one cup I get 125-130 grams. Please decide what works for you.
MAKE IT EVEN FASTER! See how to make it in 1 3/4 hours in my blog. Click here.
No Dutch Oven? Didn't Turn Out? Other Questions? Click here.
I don’t know what happened but my dough was soooooo liquidy. I weighed my flour and added exactly right amt water. What could account for this?
You might find the answer here:
https://www.jennycancook.com/no-knead-bread-solutions/
I don’t have a Dutch oven! What temp & how long in a regular oven??
A “Dutch oven” is the pot used in this recipe. If you don’t have that kind of pot, you can find other ways to make this bread here: https://www.jennycancook.com/no-dutch-oven/
Is there a way to make
2-HOUR Fastest No Knead Bread Keto?
This recipe needs gluten.
My first try. Used 100% whole wheat flour. Dough was not sticky, did not rise. Followed your recipe including making sure water was not too hot. Unfortunately. I was disappointed. Not sure what happened.
This recipe calls for bread flour or all purpose flour and will not turn out using whole wheat flour. You might like my whole wheat version here: https://www.jennycancook.com/recipes/whole-wheat-no-knead-bread/
Can I make this with sprouted wheat flour? If so, what are the ingredient measurements?
This was my first time ever making bread and it turned out beautiful and very tasty! I was so excited that I squealed when I took the lid off of my Dutch oven. I followed the instructions exactly.
I have made a total of 5 of these loaves. The only one I was able to form a ball out of it was the first one and it was fabulous. Not sure what I am doing wrong. They have all been ok, but the other 4 were dense because of maybe how much flour I needed to even keep it from spread way out. Help
You might find the problem here:
https://www.jennycancook.com/no-knead-bread-solutions/
Jonah – thanks for the tip about Stonemill Everything Bagel and Jalapeño seasoning! I’ll try it!
Great recipe! I added 2 T Stonehill Everything Bagel Jalapeño- it adds a great deal of flavor and it is NOT spicy- just flavorful. Thank you for this great recipe.
I made this bread using the least amount of flour and it was crispy and light. A wetter dough, a bit harder to work with but fantastic results.
This is the easiest no knead bread recipe I’ve tried. To the last loaf I made I added sun dried tomatoes, kalamata olives, sliced garlic and feta cheese. My family and friends really enjoyed the bread.
Thank you so much for the recipe!
Can we add “Poolish” to bring extra flavor and texture to the bread?
Can I use whole wheat flour? Thanks!
This bread is wonderful. I swap a third of the bread flour instead using rye flour and I add caraway seeds. I do the same for the no knead rolls. Wishing Jenny and her whole family a happy 2026!
Made many loaf’s of this recipe this year. Big problem the Bread did not taste good at all. Was like eating cardboard, with No Taste. Very disappointed ! Really liked making the bread faster, but not when it does not have any taste,
Try adding more salt. I’ve seen quite a few mentions of people preferring more salt, which is the primary source of flavor in bread.
I make these loaves every year for teachers gifts. It’s now a tradition and they all love it! I make 2 at a time in the oven and deliver them warm in the afternoon at pick up time. Delish!!
For a Christmas treat I added 1 cup dried cranberries and 1/2 cup chopped pecans along w with 1/2 cup sugar. Baked according to your recipe. It was done after 30 min covered. Wonderful moist bread.
I’ve made the regular recipe several times. Its our go to bread. Have not bought store bread since I learned this from you during the pandemic. Thanks so much for this and all your recipes! Merry Christmas!
Has anyone tried to use sourdough starter in this recipe and if so how did you adapt the recipe?
Can you let the dough rise for longer than 2hrs ?
I was looking for a quick recipe that I could make in my mini multi-cooker, which has a “bake” button. I found this recipe and decided to try it. After the first 40-minute cycle finished, I flipped the loaf upside down and started another bake cycle. When it was almost done, I checked the temperature, and it was 210 degrees. Then I left the lid off and let it go a few minutes more. Total bake time was right around 80 minutes.
The bread had a good crumb, but was a little doughy in the middle, which I attribute to not letting it cool before slicing. Warm bread and butter was too good to resist!
I will be making this again, it’s delicious!
I love when a friend that I make bread for says thank you for taking the time to bake this. This is one of the best recipes I have ever made. Easy, quick and delicious. You will never bake another bread better. I Just purchase a cast iron bread oven just for this recipe and it works amazingly. ❤️
I love this recipe. Why do you remove the parchment paper in the last step? I have always left it in.
I love this recipe! I enjoy baking but never really felt successful with bread. That is until I used Jenny’s recipe. My family demands it now! It is so simple and really quite fool proof. So for a beginner bread maker, this is the perfect start! I am now trying other types of bread as I grow more confident.
Thanks Jenny for your wonderful recipe!
This recipe is so good and very easy. I use it all the time and change it up. I sometimes put cinnamon and sugar and roll it in the center. I have also added various herbs and sprinkle salt on top. So many options.
This is really delicious and easy! Now I did make adjustments, I used white spelt, and I had to proof my yeast with a little sprinkle of sugar first in the warm water, because it was active dry yeast not instant. Now with spelt it was a sticky hot mess, not able to form in a ball, but it helped using the bowl for the second prove so it wouldn’t take over the counter like the Blob… however followed the rest of the recipe using a casserole dish as that’s what I have and wow! This was so good!! It rose beautifully, had an amazing crust and color and soft on the inside! Definitely a keeper! Thank you Jenny!
I have made this bread more times than I can count (for years!) and each time it was a complete success. I always make it 100% white whole wheat.
It hasn’t mattered if the dough was loose or thick. I never worry about that. All flour varies a bit, as does humidity, so making a clone of the bread you made last time is not always possible.
Dense or open crumbed, I always have a delicious loaf using this ultra simple recipe ( and I always double it and bake one big loaf).
Thank you again Jenny for this stunner!
I have made this bread many times. I have made the original, fast, and fastest versions, all with great success. I recently read information about different types of flour and tried the “00” pizza flour because it rated closely to more digestible Italian flour. I used this flour in the bread as a trial. For anyone interested, I don’t recommend using this flour for this recipe. It took almost 5 hours to rise and the end result was a very crispy crust but not bread quality. This is just an FYI for those of you experimenting. Jenny’s is a perfect recipe and everyone loves it!!
I think the temp is too high. I took out 7 minutes early and the bottom crust was too hard and it had browned fine at that point. I might try dropping temp from 450 to 425 for baking.
The FAQs might be helpful too.
Excellent, expect the stickiness to be high when mixing, I didn’t use a fork long enough and it was hard to get off my hands and back into the dough but we made it!
Best bread recipes are Jenny’s❣️
Easy and they taste absolutely fabulous ‼️
I love watching the videos because Jenny is as funny as she is beautiful♥️
I am looking at the recipe for Fastest No-Knead Bread. Like another commenter, I am seeing that the recipe, online calls for 2 tsp yeast. But, in Jenny’s reply link to the previous commenter, she says in the video — twice — she says “1/4 tsp yeast”. I am using instant yeast. Please let us know what the real answer is! My family and friends are crazy in love with this no-knead bread! I came across the recipe during the Covid quarantine and have been making it ever since. Always turns out perfect. Thanks, Jenny!
This recipe has no video. There are two different recipes: “Faster” uses 1/4 teaspoon of yeast and “2-Hour Fastest” uses 2 teaspoons of yeast. “Faster” has a video and “2-Hour Fastest” has no video. I hope that helps.
This was incredibly easy to make. My first time making this recipe , looks delicious. Waiting to cool down before cutting into it
In your video you mention only 1/4 teaspoon yeast and the recipe calls for much more. What’s the correct amount? Also you say in the video it doesn’t matter what kind of yeast, and the recipe call for rapid rise or instant.
You are looking at two different recipes. This 2-hour version does not have a video.
At a hundred miles an hour I impulsively pivoted from the original NYT recipe to this technique. I had proofed the dough for two hours in a slightly warm oven, and of course as a result the dough had doubled quickly and was covered with bubble craters so I decided to gamble it had gone far enough. The dough was a little wet, so I floured it more than usual as I scraper-folded it. It didn’t rise much during the last fifteen minutes rest and I was worried that it would be a lead balloon, but in the oven it came to size.
I’ve decided that my oven is a bit hot, bottom crust is a bit dark, but acceptable. I think I’ll drop the temp to an indicated 430 next time and see how that goes.
My result was acceptable. Denser than the usual, with a smaller, closed crumb, but not bad. I do suspect that some fermentation flavor complexity is inevitably lost through the fast method, but it’s good to have the alternative.
Jenny’s FAQs (Solutions) are excellent. Thanks, Jenny
Made this a couple times now with consistently wonderful results. Do you think it could be divided for bread bowls? If so, how would you do that?
Fast and Easy to Bake
My family Loves this bread and I always have to double the recipe because it disappears quickly!😂🤣
I’ve made this bread many times and it always turns out perfect. We love this bread.
The only time I failed was when the water I used was too hot, which probably killed the yeast. It didn’t rise and it was very dense.
Any tips on adding seeds (like everything bagel seeds) to the top of it?
Please see the FAQs:
https://www.jennycancook.com/no-knead-bread-solutions/
Made as noted. Read comments and added pizza stone under Dutch oven, And reduced heat to 425 for last 10 min. Brushed round w olive oil and added Everything Bagel seasoning on top prior to baking. Yum.
I do not have a scale right now. Will this still turn out if I just use measuring cups? Thanks
This recipe is measured in cups.
Jenny, thank you, thank you for this awesome recipe. I have made it countless times and it turns out perfectly every time. I often take a round as a gift and receive rave reviews. I’ve made rosemary garlic and cranberry walnut in addition to your original recipe. Happy Baking!
How do you remove the parchment paper from under the bread before you put it back in oven for remaining 10-15 minutes?
You can see how in my video for the “Faster” No Knead Bread (about 5 1/2 minutes in) https://www.youtube.com/embed/I0t8ZAhb8lQ?autoplay=1&wmode=transparent
I don’t have fast rising yeast. Can I use regular?
I just made this delicious bread. I was pleasantly surprised that it was so quick and easy.
I did use a heaping 1/2 teaspoon of table salt as opposed to kosher salt since it wasn’t specific. It was perfect
On instagram I saw someone put a couple of ice cubes in the pot with the dough again perfect results.
Thanks so much. Can’t wait to try your other recipes.
This bread is so good! I’ve made 2 loaves this week. My family loves it. Thank you so much for the recipe.
I love this recipe!😋, I mix it up sometimes with part whole wheat and part bread flour varying amounts and just weigh the flour to 390 g. It comes out great every time! So easy, so delicious and so beautiful. The dough is wet to start but just follow the recipe IT WORKS!, Thank you Jenny
Easier and fastest bread recipe I’ve ever seen. The result is a delicious bread with an amazing crunchy crust. I’m in love! Definitely saved in my favorites, I’ve been making it for 3 years now.
Hi,
I am just a little confused.Looking at this recipe it calls for 2 tsp. Yeast. Yet when watched Jenny making this in her video, she definitely says to use only 1/4 tsp. That is quite a difference!
They are two different recipes.
I’ve been making this bread recipe since the pandemic. It comes out delicious every time!! Thank you for this quick, easy recipe!
This is the worst wettest, dough recipe ever!! Ingredients are all off, let is more like batter. After adding flour it still wouldn’t form into any shape. Poured it in the GARBAGE.
Can I proof this recipe in my stove what h has a profer
This recipe does not require proofing in a warm spot, only at room temperature.
Just wondering if you ever tried it in a bread pan
I’ve made bread with this recipe many times. Today was my first fail. Instead of measuring the flour, I weighed it. 3 cups only weighed 325 gms, not the 360-390 cited above. So I put the flour back in the canister and tried again. Same thing.
I went ahead with the 3 cups and ot definitely wasn’t enough flour. The dough was more like batter. So I added more flour. Apparently still not enough. After the 1st rise, it was still really wet, so as I folded it with my scraper a dozen times I added more flour. STILL not enough. I literally poured it into the Dutch oven. Baked it and it came out flat as a pancake.
Next time I’ll try it without aerating my flour.
Side note: I used a brand new bag of flour and brand new yeast purchased this morning. Both are in date.
When you line the bowl with parchment paper wad it up first, open the sheet up and then it will easily shape into the bowl. (This also works when you line a baking sheet with parchment.
Also….. I’d like to do several small loaves as opposed to one large one?
No Dutch Oven…. suggestions?
Please see the FAQs.
I absolutely love making this bread. I have made a few modifications here and there. Like adding cheese and herbs garlic and herbs. Buttering the top when it’s almost done in the Browning stage or using olive oil on top all works work really great. I have found that to get a tender bottom crust if I put a large stainless steel baking pan on the rack underneath my covered glass dish as I don’t have a dutch oven it seems to keep the crust from getting chewy. Easier to slice. A loaf does not even last 2 Days in my house. Thank you for sharing your recipe.
So glad I found this. My husband loves bread and I hated how long it took to make it. I’ve done this twice and both worked great. Going to try to add cheese next time. No Dutch oven!! Thank you for sharing!
Followed recipe exactly (well almost – only 12 minutes with lid off to brown vice the 15 minutes in recipe) and it came out fantastic!
I was worried about mixing all ingredients at once instead of the yeast and salt until dissolved in the water then adding the flour but didn’t seem to matter. Crusty on the outside, soft and delish on the inside. T for sharing this lovely recipe.
Jenny, I had never baked anything with yeast, the thought of yeast always intimidated me! I saw your video on youtube and tried this recipe. It came out fantastic!! That led to trying every bread recipe I come across!! I have made bread everyday this week and loving my new hobby, and so are my friends and neighbors! Thanks!!
Hello, anyway to save my stiff dough? I didn’t “areate” it and now it isn’t rising or anything😢
This may help for next time: https://www.jennycancook.com/no-knead-bread-solutions/
My first time making this recipe. New at this. Tastes wonderful, my son ate half the loaf! A little soft(but done) on inside and outside a little crusty on top Any suggestions?
Do you think this can be made in a stainless steel dutch oven?
Please see the FAQs.
I’ve made this bread quite often without deviating at all from the recipe and it’s always been wonderful but lately I have been folding in freshly grated Parmesan, also making one horizontal slice in the top and adding more parmesan and a bit of butter. Tonight I added a little bit of garlic powder to the grated parmesan and am trying it at 425° because he fights with it when he’s trying to slice it. I think he doesn’t like the bottom being so darkly baked. He won’t say so cuz he’s just so happy that I made fresh bread LOL. Thank you Jenny so much for your wonderful bread recipes. You make it so easy. Wonderful
This is my go to receipe for bread. Even my husband who isn’t a bread person loves when I make this.
This is my go to receipe for bread. I add 2 handfuls of dried cranberries. Even my husband who isn’t a bread person loves when I make this.
I don’t know whats wrong… following the recipe to a T. The dough was so loose it just lay on my board and was a pile of goo. I added at least another cup of flour just to be able to scoop it up and plop it into a bowl with parchment.. Its in the oven now… what happened?
Please see the FAQs.
https://www.jennycancook.com/no-knead-bread-solutions/
This is my go to quick bread! It is so delicious! I just made a loaf to go with my lasagna for Sunday dinner. Last two loaves I’ve used bread flour and there is such a difference! Better than store bought bakery bread! Love it, thank you so much!
I mixed some whole wheat flour with white bread flour. It was all I had. The bread turned out fantastic! THANK YOU for this recipe!
We’ve been making this for years, exactly as instructed. The best! Thank you Jenny!
Sadly my bread came out very heavy, not light & doughy? I’ll try it again one day
Check my FAQs: https://www.jennycancook.com/no-knead-bread-solutions/
I am attempting to make my first loaf of bread with this recipe. I don’t have parchment paper so I’ll just grease the pan lightly. I also added a pinch of sugar because it didn’t smell very sweet and then I added some everything bagel seasoning. I’m trying to make the seeded loaf that Publix makes.
I love this recipe! I’ve made it several times in a clay baker (in which the lid and bottom are presoaked in water for 20 or so minutes.) This container is NOT heated before baking. Start in a cold oven. Perfection everytime!
I’ve just ordered a dutch oven and will try it this way next time just for comparison.
Was wondering if a pan of water in the oven would prevent the crust from being a little too tough when cutting?
I set my Dutch oven on my pizza stone to cook so bottom crust doesn’t get too tough and hard
Made this bread as is today and looked exactly like the pic. Very easy. However was lacking in flavour, maybe a little sugar would help?
You can increase the salt for more flavor.
This is what I do. This is my favorite bread recipe. I’m just about to try the rolls!
Nasty weather outside, so perfect time to try out this recipe. Only think I changed was when I removed the lid on the dutch oven, I adjusted temp to 425 and kept in for only 5 minutes. I gave my husband a slice and he came back for seconds immediately. Easy to follow and makes a yummy loaf!
I have a loaf in the oven right now! Can’t wait to have a slice!
Can you use your whole wheat recipe for just use all purpose flour for a loaf?
This was the first bread i learned to make. I was wondering if I wanted to make 2 small loaves using this recipe would the directions and time be the same? Thank you.
My go too bread my mother in law taught me last Christmas and I’ve Been in love ever since with this bread recipe. I made some again tonight’s it’s in the oven as I’m writing this thank you for sharing this recipe with everyone 😀
Tried this recipe this afternoon and it worked beautifully! I adjusted the oven to 425 for 30 mins and 10 without the lid on. Can’t wait to make this again for my family for the holidays! Thanks Jenny!
I am a complete novice baker. This recipe was easy and turned out beautiful and delicious!
Is it possible to add inclusions, like shredded cheese and herbs? If so, does it change the cook time? I’ve made this twice and my whole family is in love. Next, l plan on trying the whole wheat loaf.
There are details about additions here: https://www.jennycancook.com/no-knead-bread-solutions/
We make this weekly! So easy and tasty!
Made this bread tonite, it’s delicious!
Just made this tonight and it was so good!!
Why does this recipe say 2 tsp yeast, but the YouTube video says 1/4 tsp yeast??
They are two different recipes: “Faster” and “2-Hour.”
I’m a novice baker and this was my first attempt at making bread.
Always comes out great.
Could I substitute rye flour for a quick no knead rye bread?